A big blue canopy set up to provide shade for work assembling the observatory dome that sits beneath it. Once assembled, the dome, weighing in at 350 pounds complete, will need to be manually lifted, moved, and placed atop a yet-to-be-assembled curved base wall.
The big Saia freight truck pulled up in front in the early afternoon July 10. The ready-to-assemble (RTA) observatory had arrived on two pallets weighing about 625 pounds each. After struggles getting it off the truck, aided by its very helpful driver, and with unexpected help from a neighbor, we stowed the base wall components in the garage. I moved the dome halves myself to a patio space adjacent to the observatory site where they are to be assembled.
Withering hot weather and a severe summer cold (ironic?) halted progress on the observatory dome assembly for several days. This afternoon, July 14, hoping to dive into the work tomorrow morning, I set up a canopy for sun protection. The portable shade along with a good electric fan ought to help extend the day’s work time until I can’t stand the heat!
It has been a long, and bumpy road but, at long last, our SkyShed POD-S observatory structure is arriving! Delivery is set for tomorrow, July 10, via freight truck. Wrangling the large and heavy parts of the RTA (ready-to-assemble) building from street to site will be challenging but I think / I hope I can manage it. One looming problem: once put together, hoisting the assembled dome to rest upon the round base wall is a task that I’m uncertain how we’ll accomplish — the thing will weigh 350 pounds! I’ll need several strong people to help lift the dome but don’t know where they’ll come from.
In the mean time, I’ve assembled a collection of tools and materials required for the assembly, the building permit is in place, and so we forge ahead.
Our neighborhood star: The Sun. Photographed in hydrogen-alpha light, this image shows the roiling chromosphere of our star with a large filament parallel with the left-hand edge of the picture, sunspots strung vertically across the center, and a good number of prominences along the rim, glowing against the dark background of space. Image has been rotated — east is up, north is right. Imaged 2024-10-26. 18:43 UTC. Credit: James Guilford, Stella-Luna Observatory
White light allows viewing Sun as if we could stare directly at it without the resulting blindness. The Herschel wedge does much the same thing but with, perhaps, a bit more contrast and detail. Both of those white light views allow us to see a layer of the solar atmosphere called the photosphere. In the photosphere the most apparent details are sunspots, standing black against a white background. With enough resolution we can also see granulation — enormous convective bubbles of searing solar plasma.
One layer above the photosphere — yes, above — is the chromosphere. Shining in the wavelength of hydrogen-alpha (Ha), the chromosphere is not visible to us without light filters that exclude all light but Ha. A wholly different view of our Sun is available in that wavelength. Swirling seas of plasma form curves and hash as they are moved by magnetic fields, long filaments float over those seas, as fountains of glowing gas arc from the solar disk contrasted against the blackness of space. On closer examination, the solar limb appears rough, a bit like a fine-toothed saw blade, as innumerable spicules, jets of glowing gas, are seen in contrast. Yes, sunspots are visible but are no longer the primary interest.
After many tries and failures at processing images to best show the chromosphere complete with prominences, I finally learned what some other imagers were using to process their images: Solar Toolbox — a package of programming scripts used with the PixInsight imaging application. I still have much to learn about Toolbox but it has already been enormously helpful to me in the challenging world of solar imaging! Thus, the image above is from very good data recorded about seven months ago, now reprocessed using Toolbox.
Monday dawned clear and bright so we set up the hydrogen-alpha (Ha) solar telescope and recorded some image sequences. Today was a dull and cloudy day so we spent some time learning new processing techniques for our solar imaging and were rewarded with our best shot yet. The processing of choice was Solar Toolbox — a script package developed for use in PixInsight software — just the set of tools we were looking for! We’ve a long way to go but we think this picture shows great progress!
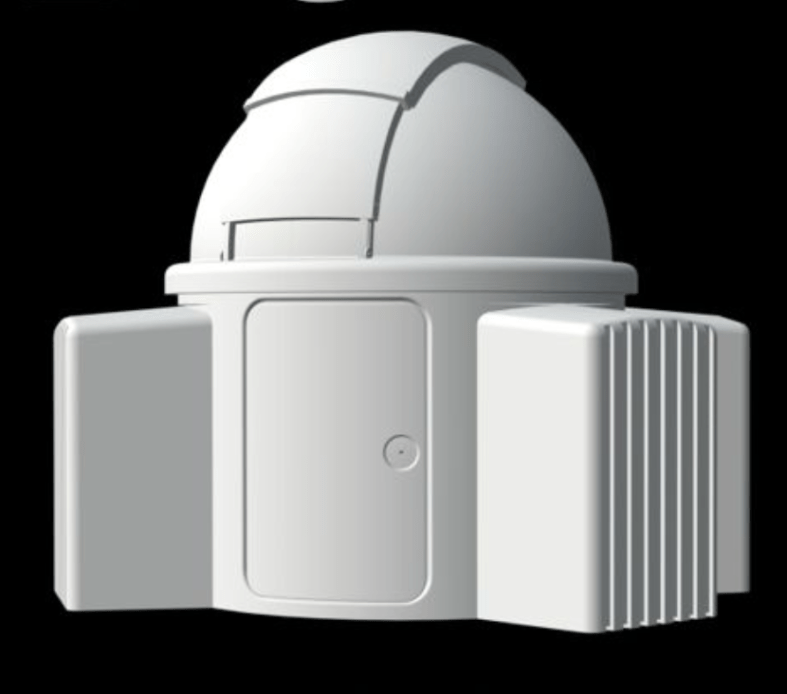
A design rendering of the SkyShed POD-S Mark 4 – Tall observatory. Image Credit: SkyShed Observatories.
Following the evaporation of our first observatory deal we revisited our pre-purchase research from two years ago. We quickly settled upon the SkyShed Observatories POD-S Mark IV in this project reset. Today we placed our order and paid for the ready-to-assemble kit.
While we were originally hoping for fiberglass construction, the POD-S is built from double-walled polyethylene — much the same as plastic garden sheds. The material actually provides some advantages over other construction but presents an interesting issue: daytime IR heating. It seems white poly is translucent to infrared light (solar heat rays) which causes the interior to heat up. We chose a light gray color which, while not the classic choice for a dome or observatory, we are told will allow less of interior heating, as it blocks more IR than the white color reflects. This flies in the face of the usual reflective white or metallic silver specified for observatories but those buildings aren’t made of polyethylene.
We don’t have production or delivery schedule information at this time (the order’s brand-new) but there are other things to do such as acquiring a new building permit, pulling electrical wire to the telescope pier site, building a warm/control room in a nearby shed.
The bad news is that the deal we made for an observatory building is dead after two years of waiting. We received the news via email this morning. The final straw was that the manufacturer was unable –due to factors outside of his control– to ship the finished package! At a financial loss due to packaging costs, he canceled the deal and will issue a refund. The problem was so bad for him, he’s leaving the US market entirely!
The good news is that we have selected a product we had researched two years ago, along with our original choice. Ironically, we originally bypassed this manufacturer because it was going to be two years before their product could be shipped. Now they ship in 6 to 8 weeks!
We’ll post pictures and identify the new choice once we’ve closed that deal. We’re actually feeling pretty good about this. Except for the time lost not having an observatory.
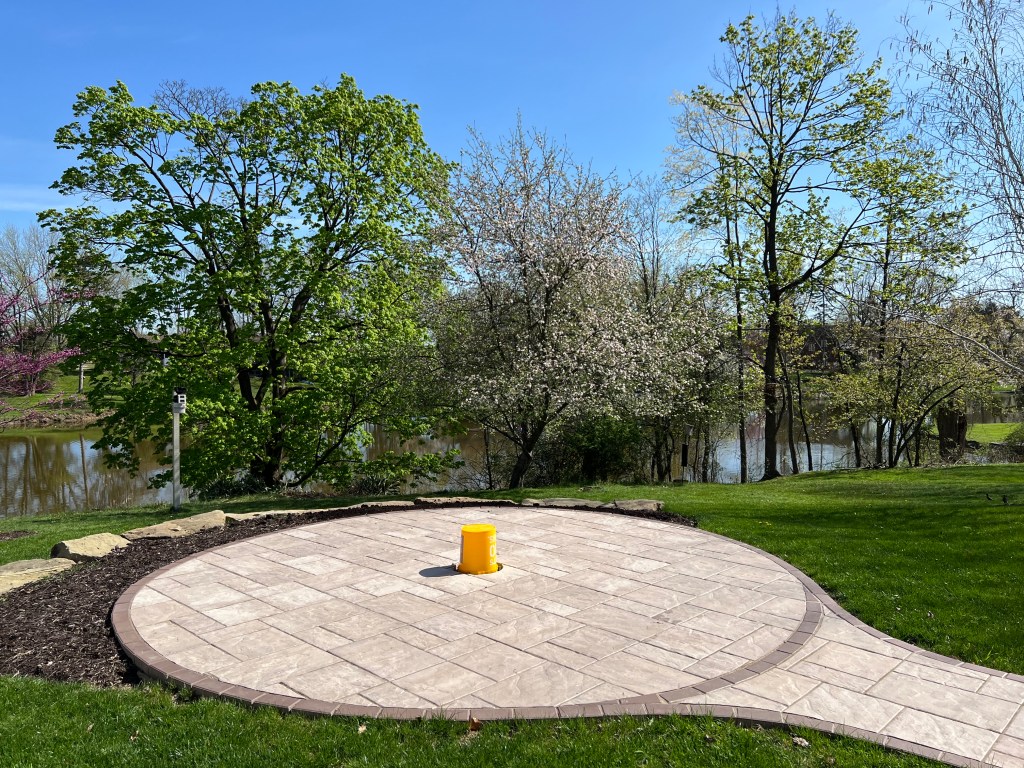
Our temporary observing setups are assembled on the base/floor of the planned observatory. The light orange bucket, at center, protects an empty electrical conduit that will provide utility power to a permanent pier that will be installed there. In the foreground is a table supporting a light shield for the laptop computer. The large tripod next to the table supports the white light imaging scope. In the background is the Sky-Watcher SolarQuest mount with our Coronado hydrogen-alpha solar scope attached.
We’re still doing open-air astronomy though we have a nice, solid, clean, and level space to set up our gear! This is the setup we were using today to record the sunspot at active region 4079 as it is about to roll over the solar limb/horizon. Fortunately, though it’s a very temporary setup, the portable gear we use for casual solar imaging is fairly easy to set up.
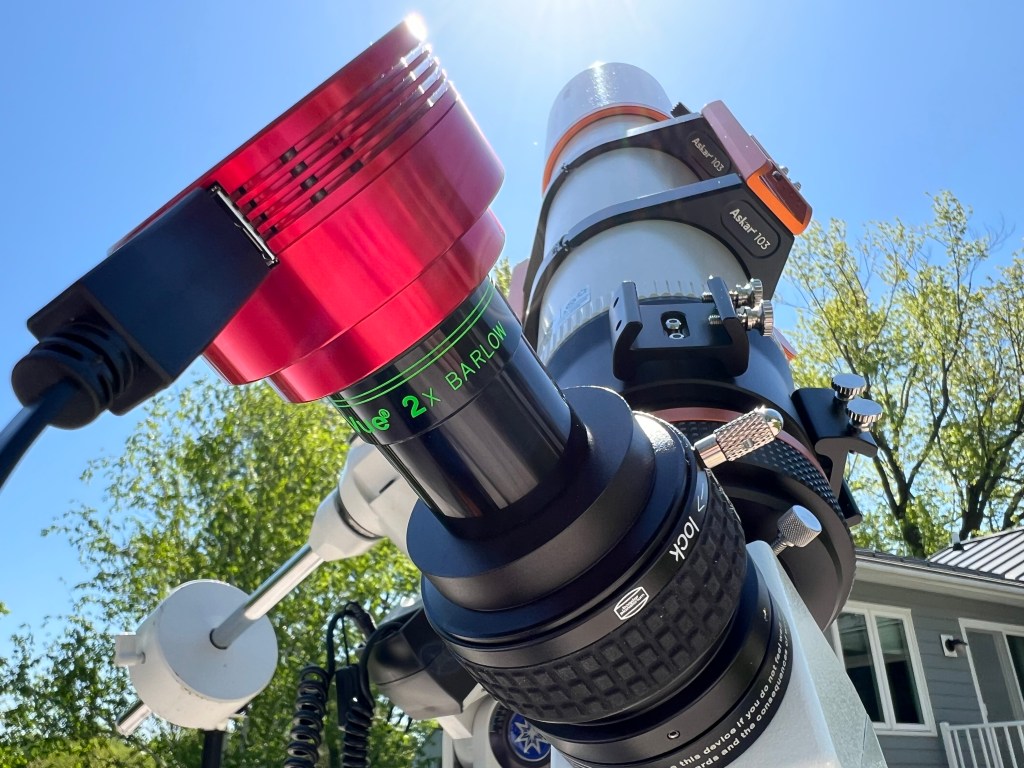
From an unusual vantage point, a picture of the solar setup used today to record the passage of active region 4079 toward Sun’s horizon. The red object is the planetary camera.
We continued experiments to determine what gear will work together for imaging. There were a few surprises and there’s need for more experimentation. What we settled on for today’s solar efforts is pictured above and includes: Askar 103 APO telescope, Meade LXD75 Goto Mount, TeleVue 2X Barlow, Baader Planetarium Safety Herschel Wedge, and ZWO ASI678MM monochrome planetary camera.
The sun as it appeared at 11:32 AM EDT on May 10, 2025. Sunspot/Active Region numbers are labeled in this image with AR4079 very near the solar western limb or edge.
Although the sky was clear, seeing was a bit shaky so once again, sharpness wasn’t what we’d like. Still, in all, we got the shot we wanted and learned a few things about our astronomy equipment. Also, the sky was blue, the air was pleasant, and birds were singing, so not a bad way to spend a couple of hours.
A closeup view of the sunspot at AR4079. There is a bright line splitting the dark central umbra of the sunspot, the gray penumbra radiating in filaments around it. White cloud-like areas surround the sunspot, especially to its north; called plage, they are associated with areas of concentrated magnetic field.
The patio floor of the observatory awaits its observatory.
Frustration continues as we await word that the observatory has been shipped. We’ll be firing off another query of the manufacturer tonight reminding them, yet again, that we’re still waiting. Not that our questions or complaints have helped move things along. We’ll likely soon go ahead with pulling wiring through the buried conduit — utility power could be helpful even without the building. We hope to install landscape plants next week in the curved area along the north (left) edge of the patio. Our plant of choice is “Creeping Juniper”. Will we need to make some sort of temporary telescope shelter while we await our observatory (telescope shelter) in order to make better use of what we have? Maybe.
The Sun, as it appeared on April 17, 2025, in hydrogen-alpha light. The image was recorded using a Coronado solar telescope, a Sky-Watcher SolarQuest mount, and a ZWO ASI 678MM camera. Photo by James Guilford.
Taking advantage of midday clear skies, Thursday, we set up the hydrogen-alpha telescope and did a little observing and imaging. Seeing conditions were only good but we could make out several prominences along Sun’s limb. (The proms did not record well and we need to figure out how to enhance their visibility in our images.) Most notable, however, was the shear number of filaments in Sun’s northern hemisphere. None visible in the south! Fragments of exploding filaments launched from Sun and produced two CMEs that, when they reached Earth on April 16, caused strong geomagnetic storm activity and widespread auroras. The storm, however, died out before northern lights could be seen here.
The Sky-Watcher SolarQuest mount is shown here aiming our Coronado 60mm hydrogen-alpha solar telescope at Sun.
Aiding in our efforts was a device we used for the very first time in this session: The Sky-Watcher SolarQuest with its HelioFind system. The device is lightweight, easily supported our rather robust Coronado solar telescope, and was exceptionally easy to learn and operate. Essentially, all that was needed was to set the tripod up so that it was level, turn the device on, and let it do its thing! It is powered by four AA batteries, placed inside the unit. As an alt-az mount, no counterweights or muliti-axis balancing was needed; just mount the scope with its balance point at the center of the dovetail clamp. No remote control, no app, the compact and self-contained SolarQuest established GPS contact, leveled the scope, then looked for Sun. The SolarQuest turned and elevated the telescope, quickly acquiring our nearest star. When the motion stopped, we looked through the eyepiece to discover Sun well within the field of view. A few nudges of the system’s adjustment buttons and Sun was centered. Tracking was excellent throughout the observing/imaging session. Provision is made for further refinement of tracking but that adjustment was unnecessary for the day’s activity. The SolarQuest will make our daytime astronomy a whole lot more convenient and enjoyable!
A business-class jet airplane trailing twin contrails is seen in silhouette against the roiling surface of the sun. The image is recorded in hydrogen-alpha light. Photo by James Guilford.
We had just finished setting up for some solar astronomy and tapped the button to begin a video sequence when something flashed across the computer screen. A jet appeared for less than a second, contrails briefly persisting, silhouetted against the roiling solar disk! We’ve only seen this twice while observing Sun, this being the second time, and we only captured this image by shear luck. The first time we witnessed a solar “photo-bombing” was under similar circumstances. Previously, we had completed setup, was refining focus, and just about to begin recording exposures. We missed imaging that encounter by about the same interval as we succeeded this time!
The latest from the manufacturer of our observatory structure: “The [shipping] broker advised me to wait until the 2nd of April USA time to see what extra paperwork there might be under Trump’s tariffs.” It appears to us that our tariff-loving President’s “Liberation Day” will mean more money “liberated” from our bank account.
And so, another delay in shipping, for yet another reason — they recently had to remake the shipping crate due to wood content — costing more money in the end. If the manufacturer had shipped earlier, and from our viewpoint, it appears they could have, this latest mess and expense would have been avoided — it’s not like it was a secret widespread tariffs were coming!
We can only hope all will be resolved and shipping will actually begin early this month. Will we be able to build the thing this summer, a year-plus from our original expectation?
The experience has, thus far, been frustrating, and disheartening. We have little faith the path ahead will be smoother.
Note: We know of no U.S. manufacturer of small observatories made of fiberglass or non-metal materials. These unique products are imported and subject to shipping charges and import costs such as tariffs.