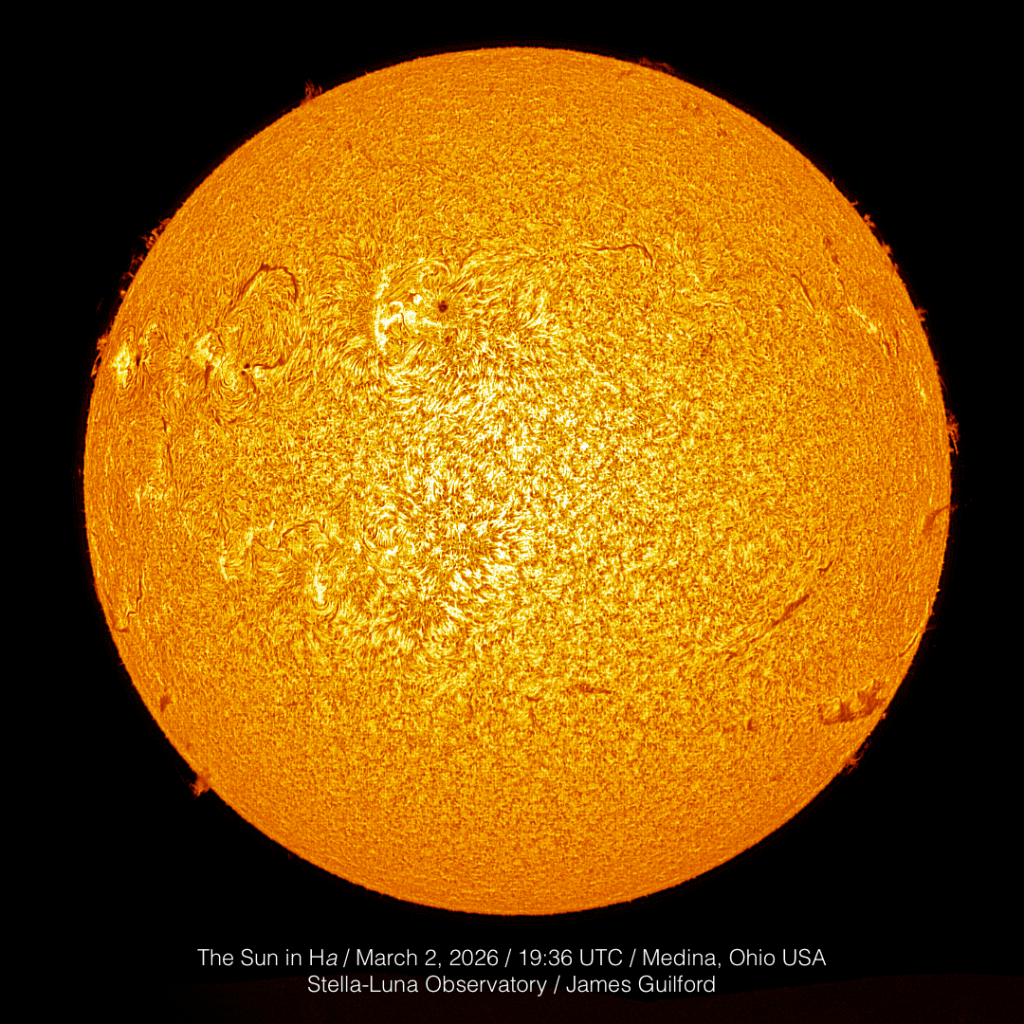
This image depicts the northeast quadrant of our Sun, as recorded the morning of March 2, 2026. The data collected were in hydrogen-alpha light and depict well the turbulent curves in the chromosphere resulting from Solar plasma interacting with strong magnetic fields surrounding two sunspots shown here, left to right: Active Regions 4384 and 4381. Several tenuous prominences are found along the rim of the circle. This is a non-colored monochrome image. // James Guilford, Stella-Luna Observatory
It was the last sunny day expected for, likely, a week so we had to get out and image our Sun. Well, we would have done it anyway! Seeing conditions were forecast to be better than average but at midday, when we have our first clear shot at Sun, the atmosphere was stirred up and shaking our view. Still, the miracle of “lucky imaging” came through and we were able to make passable pictures from the image data. Interestingly, the sunspots at Active Regions 4384 and 4381 are the remnants of the giant sunspot formerly known as AR4366 surviving a trip around the far side of our star! Sunspots, by the way, receive new designations when they are first observed appearing over the eastern horizon even if they were previously observed as they disappeared over the western edge.
Both of these images were the result of data stacked in ASI’s VideoStack application. The image above was then processed only in Pixelmator Pro. The image below was processed in PixInsight/Solar Toolbox, and Pixelmator Pro.
An image of our Sun taken in hydrogen-alpha light reveals a turbulent chromosphere, marked with a few dark filaments. Three sunspots are found in the left-hand portion of the disk though difficult to see via hydrogen-alpha. False color has been added to this image. // James Guilford, Stella-Luna Observatory
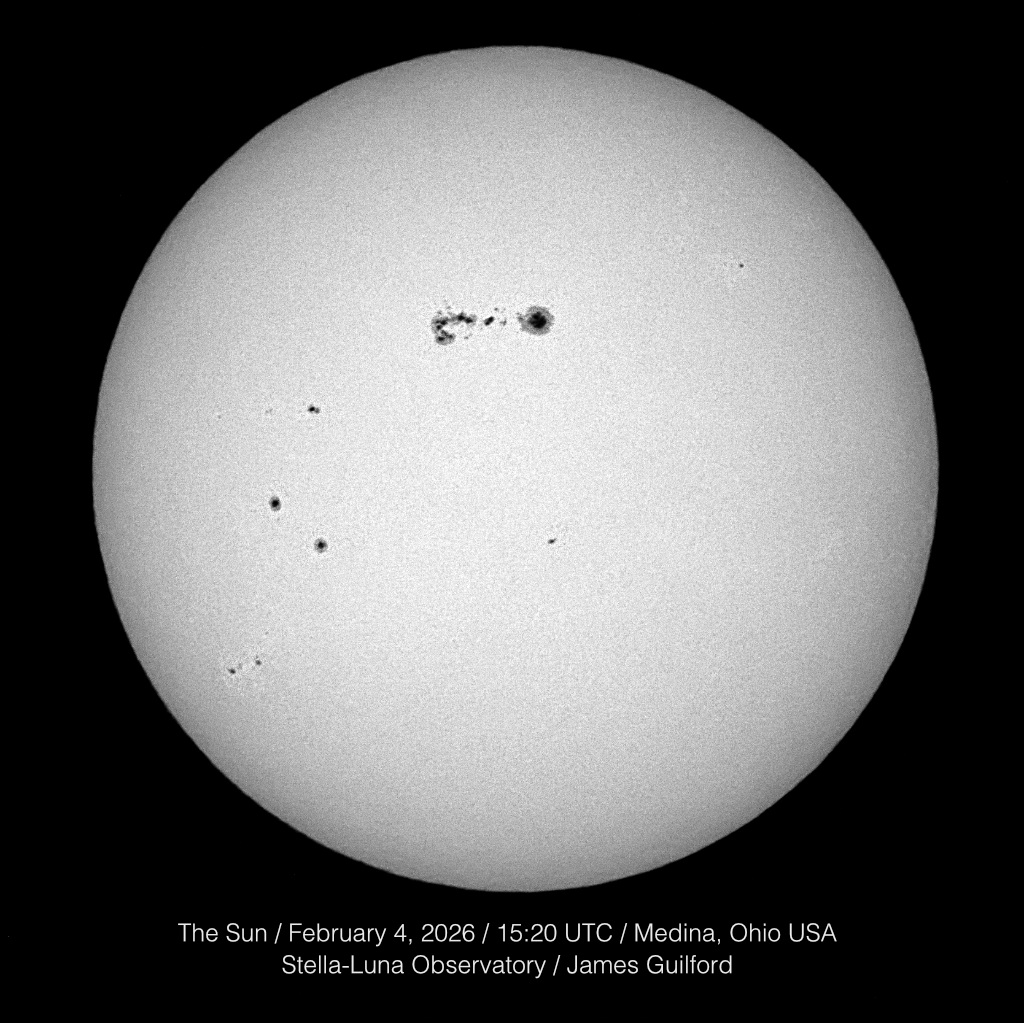
Shown in white light is our Sun as it appeared on February 4, 2026. A large sunspot, designated Active Region 4366, drew much attention as it transited the surface, issuing flares along the way.
On sunny days, this winter, when it’s not bone-shatteringly cold, we’ve been imaging Sun. In white light, we’ve tracked the progress of a couple of impressively-large sunspots as they traversed the Solar photosphere, including one designated Active Region 4366 that drew global attention in late January and early February 2026. We’ve also been observing in hydrogen-alpha (Ha) light.
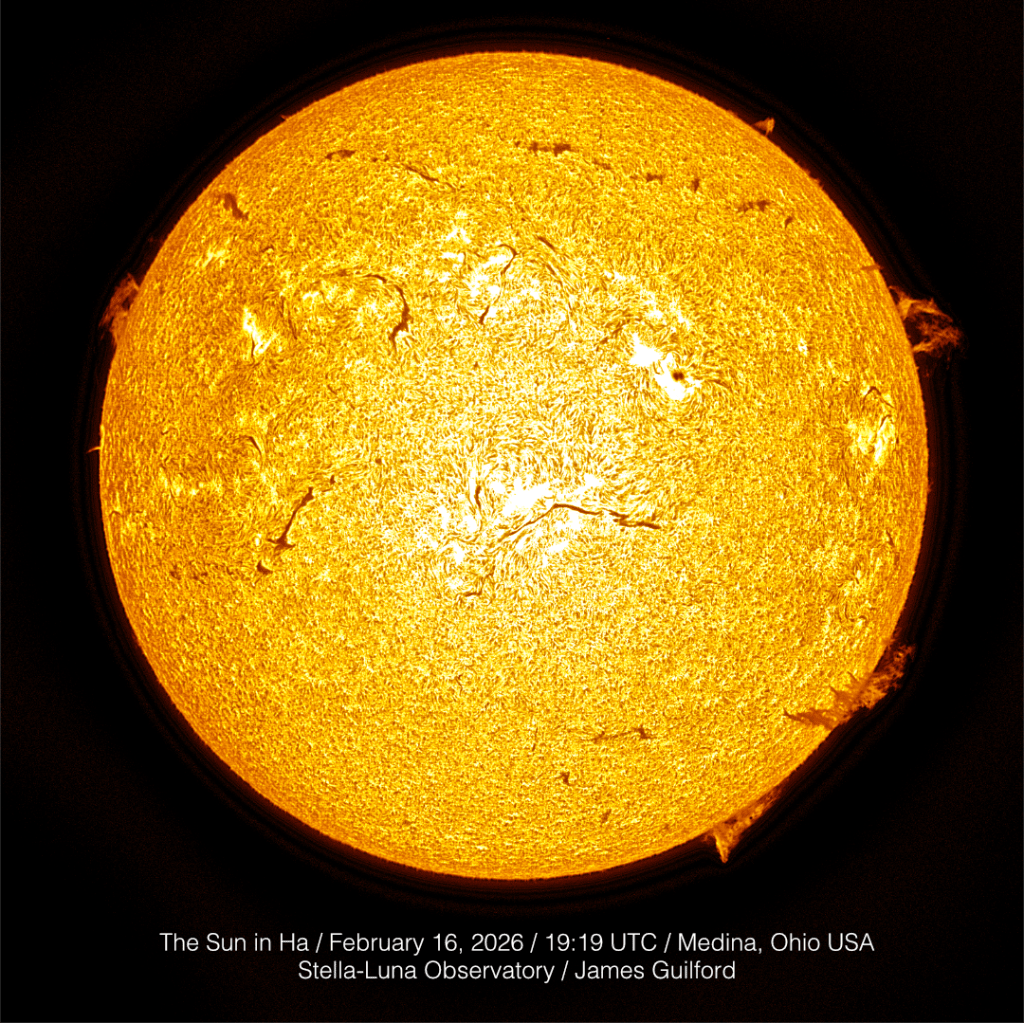
The NOAA SWPC Solar Synoptic Analysis map showing Sun on February 16, 2026.
On sunny February 16, we checked the NOAA Space Weather Prediction Center’s daily Synoptic Analysis map for targets of interest. Yes! The map indicated several prominences around Sun’s rim so, a great day to see what was out there.
The full-disk image of Sun as it appeared in hydrogen-alpha light. This is a monochrome image original with false color applied. The “filaprom” is located at about the four o’clock position on the disk.
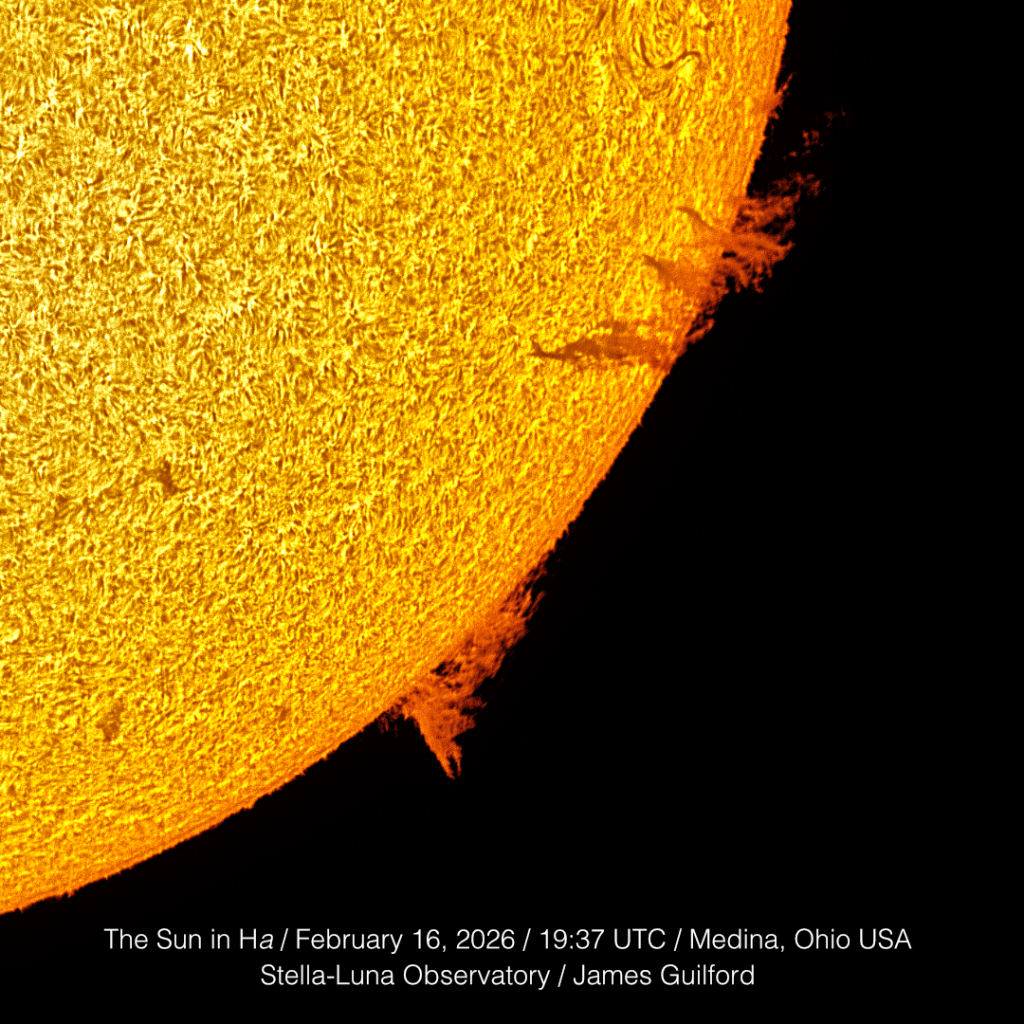
While an arch-shaped prominence at about the two o’clock position was our original target, as soon as we looked through the telescope’s eyepiece we saw it — a filaprom! What’s that? The snake-like features that appear in Ha are called filaments. If a filament bridges the Solar limb, its true nature is revealed: it’s a prominence, appearing as a dark filament when viewed against the bright chromosphere, and as a bright prominence when contrasted against the blackness of space — a filaprom! It was a first for us and delightful to observe!
Close-up view of the filaprom, near the top of the arc. Lower on the curve is a prominence issued from a position just over the Solar limb. Near the left-hand portion of the frame is a filament feature — a prominence viewed against the bright Solar chromosphere.
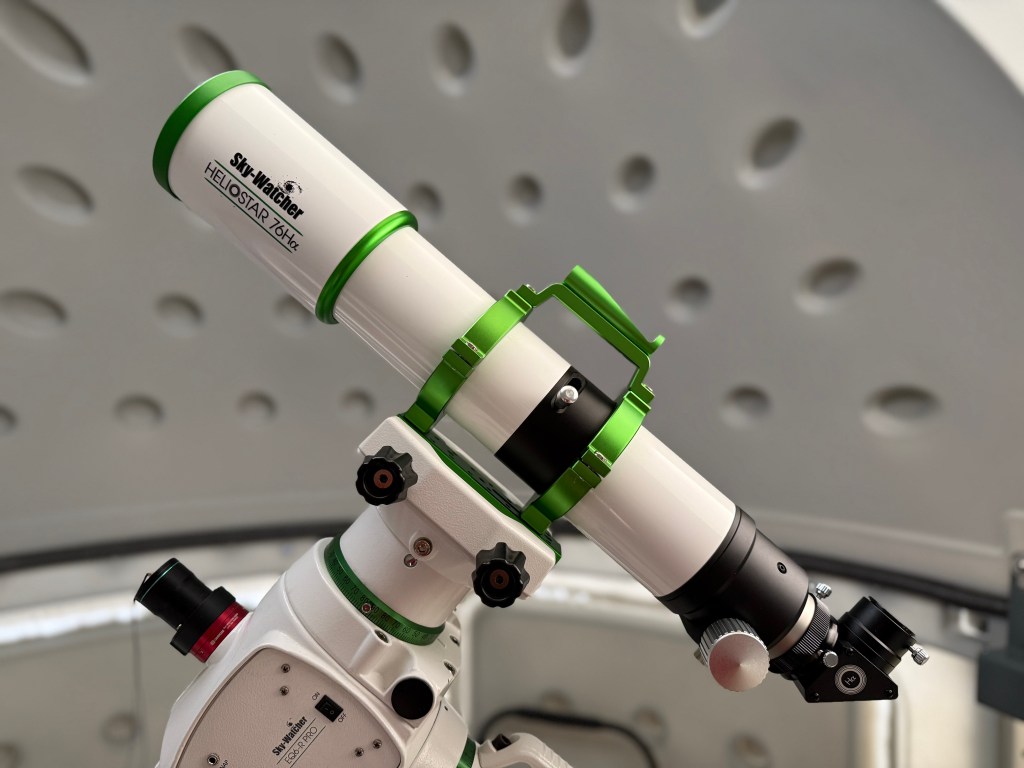
Improvements in instrumentation and processing skills helped with both the capture and depiction of our nearest star’s activities. We recently upgraded to the relatively-new Sky-Watcher Heliostar 76Ha telescope and that has made a huge difference in visualizing the chromosphere. The telescope’s filtering system, with a “single-stack” arrangement, is capable of 0.5 Angstrom or better which really brings out detail — stronger image “signal” produces image data that are easier to process and edit. More about the telescope another time.
The Sky-Watcher Heliostar 76Ha telescope in its parked position beneath the observatory dome.
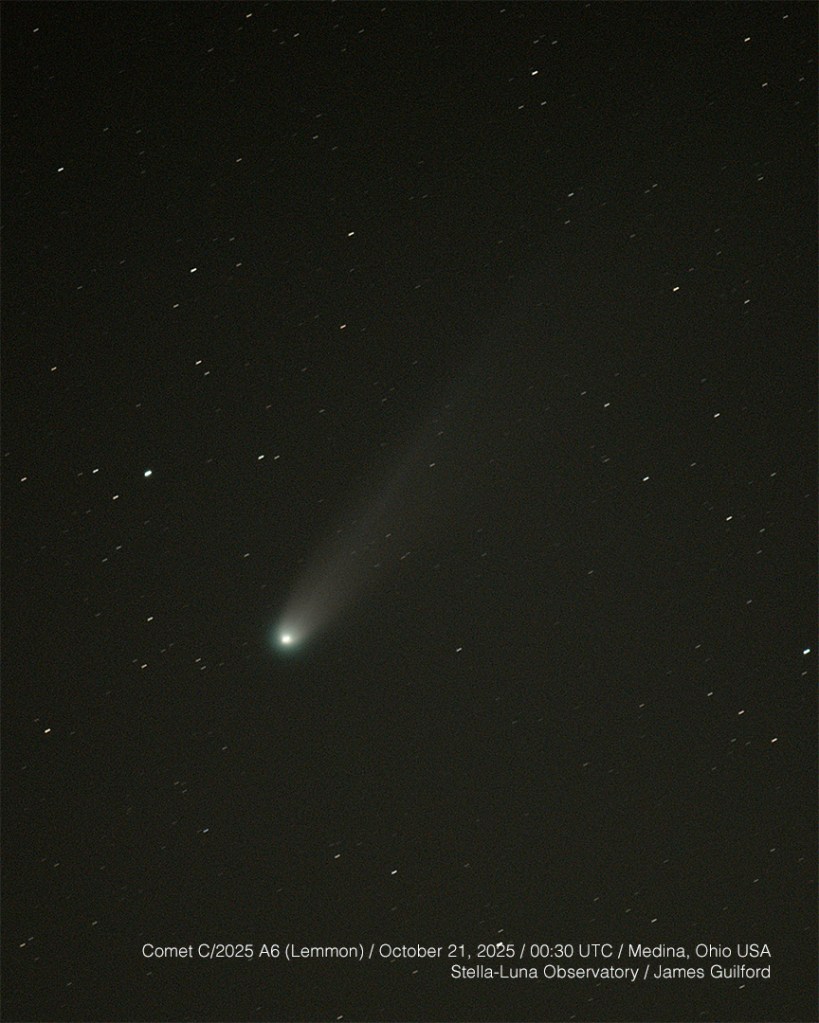
Single exposure image of Comet C/2025 A6 (Lemmon), October 20, 2025. Tech: Canon EOS 5D Mk. 4 DSLR, 400mm lens, f/5.6, ISO 10,000, 4 seconds.
October 21, 2025 — It was a tough one to find but, after a good deal of effort under near-pristine (for us) skies, I was able to spot the comet C/2025 A6 (Lemmon) from a Medina County, Ohio park. This (above) is a quick edit of a single frame. Star tracking wasn’t what it should have been; I’ve got to get more practice in the field! I worked on combining multiple frames the next morning, attempting to create a better quality image.
Stacking RAW images of C/2025 A6 (Lemmon) I did what I could to pull the most out of the imagery. What we got was a somewhat “cleaner” version. Not spectacular but the best we could do given all circumstances. I hope to learn improved processing skills and revisit the source images in the future. In the meantime, though the pictures are not spectacular, I’m happy to have bagged another comet. After all, how many of them do most of us see in a lifetime? These were recorded the night of October 20 but the UTC time conversion moves the date to the 21st.
Stacked image of Comet C/2025 A5 (Lemmon), October 20, 2025A SkySafari chart showing the position of Comet C/2025 A6 at about 7:30 PM EDT, October 20, 2025, as viewed from Northeastern Ohio.
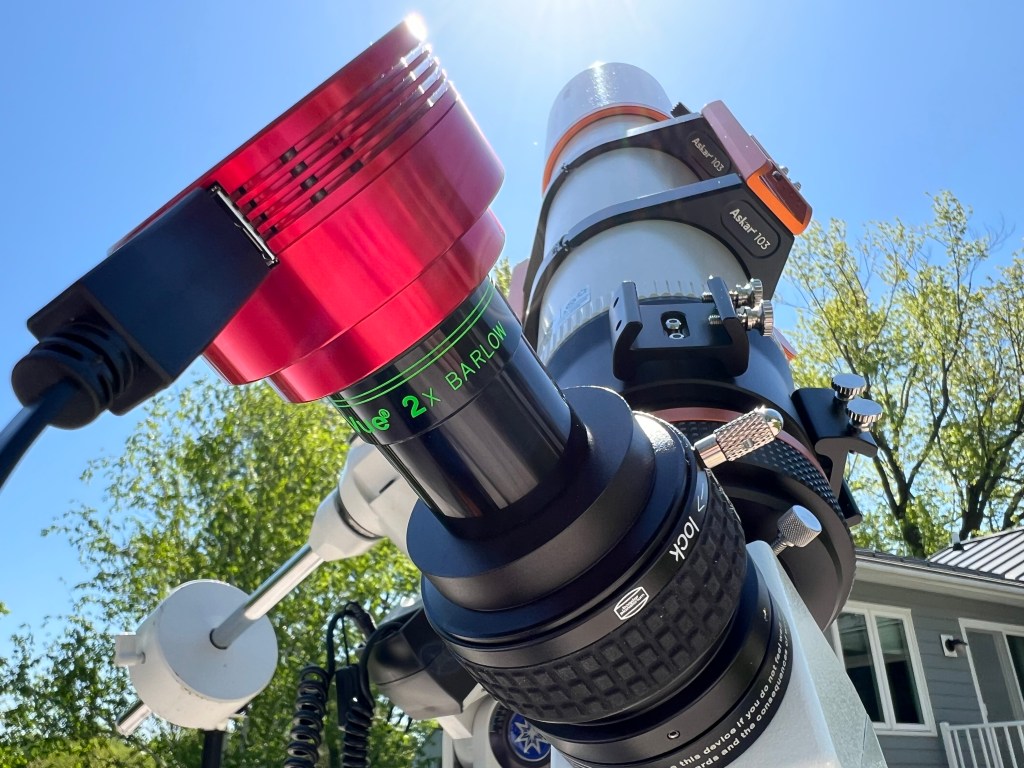
November 3, 2025 — The air was still and the moon so bright and clear tonight, we had to open up the observatory long enough to take a peek and a pic! Moon was 92% illuminated in its waxing gibbous phase, lighting the landscape around us, no flashlight required. Technical: Askar 103 APO telescope, TeleVue Powermate 2X Barlow, Canon EOS 5D Mk. 4 DSLR, single exposure.
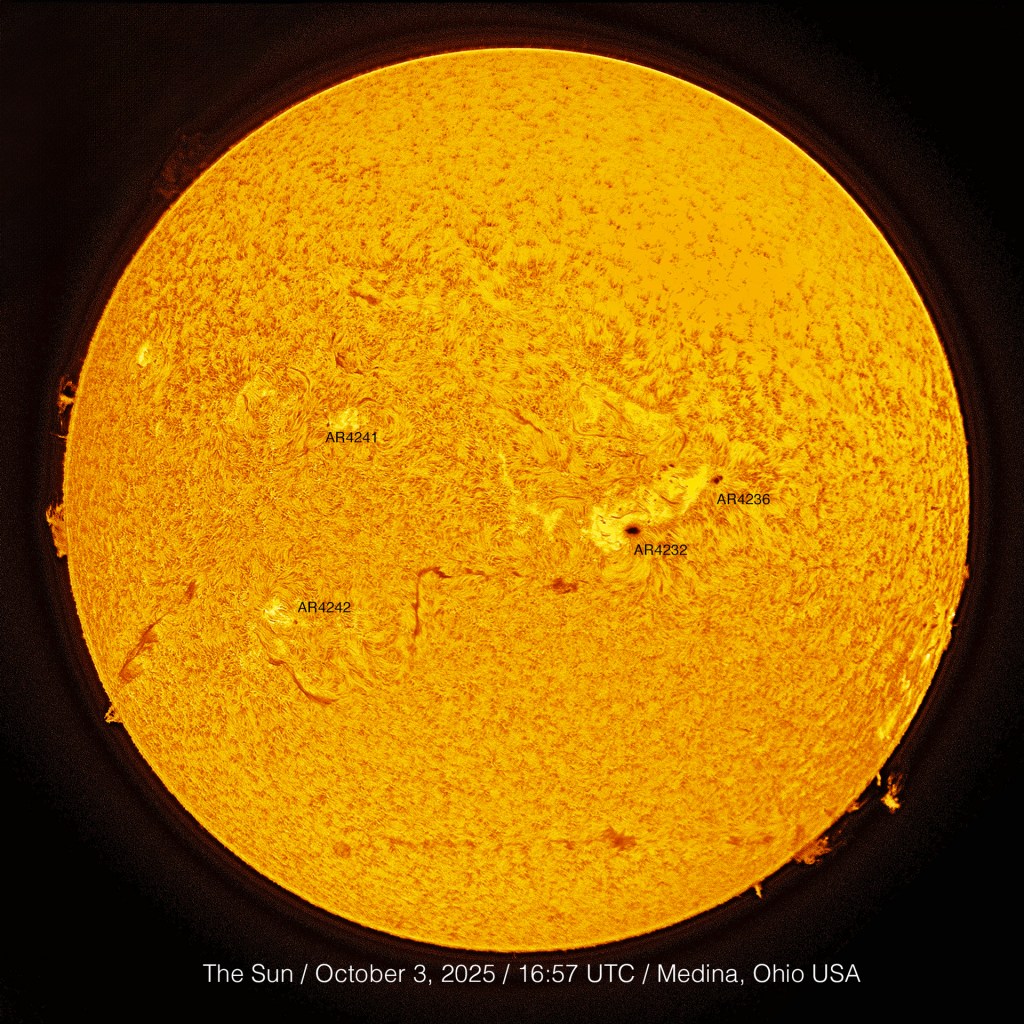
A full-disk image of Sun, as recorded in hydrogen-alpha light. Visible are two large sunspots, several serpentine filaments, and prominences that appear around the star’s limb. Credit: Stella-Luna Observatory / James Guilford
October 3, 2025 — We had been having quit a lot of trouble lately, recording data and reproducing images of Sun with prominences. There was some early success but even those images were a struggle to produce. Taking a look at suggested camera settings found in an article on solar imaging, one thing stood out — gain! We had nudged the camera’s gain setting upward and that’s not helpful and certainly not recommended; the setting should be very low or even zero! A few adjustments in data capture parameters was all it took to make a big difference in image processing and results!
Sun’s northeast quadrant, as recorded in hydrogen-alpha light. Visible are several filaments, as three prominences appear along the star’s limb. The “peach fuzz” appearance of the edge of the solar disk is caused by the presence of innumerable spicules or small prominences.
We’re very pleased with Barlow-boosted views, shown here, though we’re still having some issues with achieving even lighting across whole-disk views — just can’t seem to get them tuned right with the Coronado SolarMax III. Visual observing was also very good, especially with the TeleVue 10mm eyepiece. October 3 conditions: Clear sky, temperature of 74°F, light southeast wind.
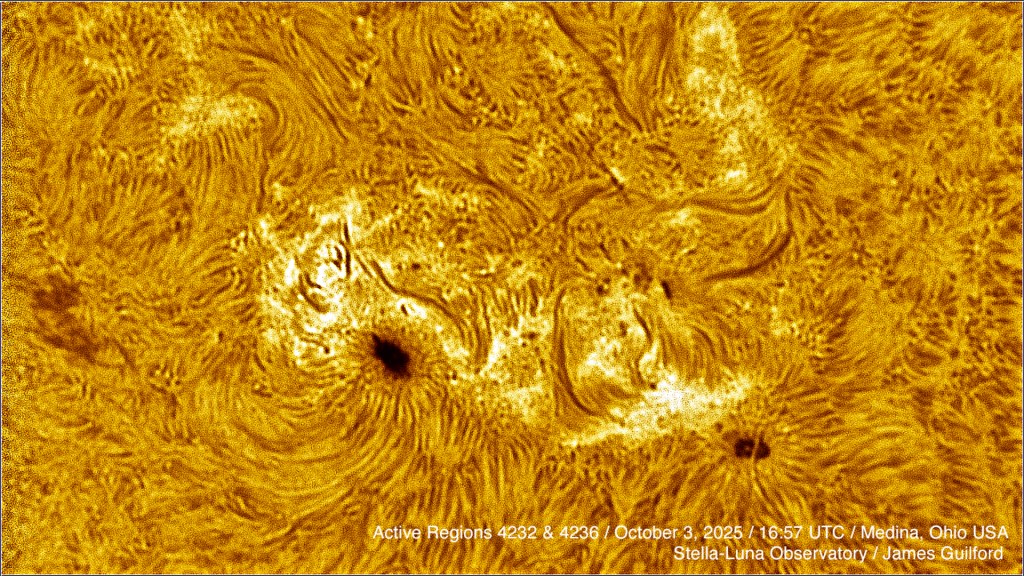
A close-up view of two large sunspots, as seen in hydrogen-alpha light. Solar plasma follows the intense and curved lines of magnetic force to highlight the turmoil in the vicinity of the spots.
An International Observe the Moon Night promotional graphic. Credit: NASA
Note: The observatory construction is essentially complete with only a few “touch up” items and further outfitting remaining. We’ll eventually get around to writing and illustrating the story of the project. First, though, the 2025 International Observe the Moon Night….
October 4 marked International Observe the Moon Night (IOMN), an event billed as an opportunity to “unite people across the globe in a celebration of lunar observation, science, and exploration.” Coordinated and promoted by NASA, IOMN boasted 1,045 registered events worldwide. That count does not include informal events and individuals who, on their own, observed Earth’s Moon, encouraged by the promotion. Unfortunately, due to a U.S. government shutdown, NASA staff are unable to update the IOMN website and we may never know how it went this year.
While we did not host an outreach event, we did post fresh, new telescopic images depicting lunar details, along with descriptions of those events as our participation. This year, we concentrated our efforts on the Threads social media platform. What follows is what we posted.
Here’s a nice full-disk view of Earth’s Moon, one we made a few months ago with a phase very close to what we see tonight. The phase is called the “waxing gibbous” and is seen between the First Quarter and Full Moon. Moon will reach its full phase the night of October 6, this year.Mare Humorum, aka Sea of Moisture, is the dark circle at the center of this image. It was formed in an impact by an asteroid or comet, the crater filled with basalt. The “sea” is about 264 miles across and is seen here near the terminator — the dividing line between night and day — not long after local lunar sunrise. Crater Gassendi is the circular ring that intersects with Humorum. The crater is about 69 miles in diameter; a smaller crater at its northern edge is called Gassed A.
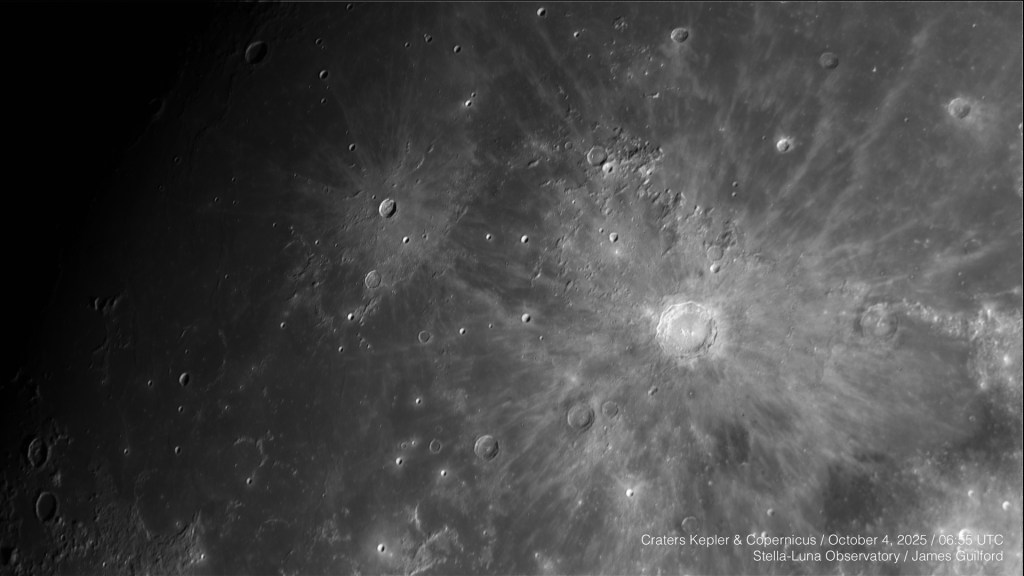
Followup Edit: Spellcheck was convinced we meant to type “Gassed” when what we really wanted was Gassendi A. Maybe it was the chili we had for dinner. Here’s crater Tycho, prominent even in the heavily-bombarded southern lunar highlands. Estimated to be 108 million years old, Tycho is about 53 miles in diameter but easily spotted using binoculars or a small telescope. The crater’s vast field of ejecta rays — the spray of material “splashed” out when an object hit Moon — is bright and forms lines that lead back to their origin. The feature was named after Danish astronomer Tycho Brahe.Also near the terminator, in Moon’s northwest, is this beautiful pair of craters: Kepler (left) and Copernicus. Like Tycho, Copernicus is marked by the prominent lines of ejecta radiating from the impact site, a crater about 58 miles in diameter. Crater Kepler, about 20 miles wide, lies to the west of Copernicus with its western rim shining brightly in the light of the lunar sunrise. For our final image of the night, we’re posting our image of a complex area of Moon at the northern end of the terminator. In the upper right we see crater Anaxagoras and surroundings glowing brightly, contrasted against the stark blackness of space. The smooth band spanning the image is Mare Frigoris. “C” shaped arch marks Sinus Iridum, opening to Mare Imbrium. Crater Plato is the circle with a smooth, dark floor in the lower right. Notice the chain of smaller, satellite craters next to Plato.
Crater Plato is about 63 miles in diameter and about 3.84 billion years old. Once again, see how the western rims of the craters along the terminator shine in the low-angle light from the rising Sun.
We hope you have enjoyed what you have seen and will see online tonight, or were fortunate to attend an International Observe the Moon Night event in person. Outdoors, at home, online, or wherever you may be, we’re glad to have had you with us. We hope IOMN has united people across the globe in a celebration of lunar observation, science, and exploration, under one sky, appreciating one Moon. Goodnight, and keep looking up!
Our neighborhood star: The Sun. Photographed in hydrogen-alpha light, this image shows the roiling chromosphere of our star with a large filament parallel with the left-hand edge of the picture, sunspots strung vertically across the center, and a good number of prominences along the rim, glowing against the dark background of space. Image has been rotated — east is up, north is right. Imaged 2024-10-26. 18:43 UTC. Credit: James Guilford, Stella-Luna Observatory
White light allows viewing Sun as if we could stare directly at it without the resulting blindness. The Herschel wedge does much the same thing but with, perhaps, a bit more contrast and detail. Both of those white light views allow us to see a layer of the solar atmosphere called the photosphere. In the photosphere the most apparent details are sunspots, standing black against a white background. With enough resolution we can also see granulation — enormous convective bubbles of searing solar plasma.
One layer above the photosphere — yes, above — is the chromosphere. Shining in the wavelength of hydrogen-alpha (Ha), the chromosphere is not visible to us without light filters that exclude all light but Ha. A wholly different view of our Sun is available in that wavelength. Swirling seas of plasma form curves and hash as they are moved by magnetic fields, long filaments float over those seas, as fountains of glowing gas arc from the solar disk contrasted against the blackness of space. On closer examination, the solar limb appears rough, a bit like a fine-toothed saw blade, as innumerable spicules, jets of glowing gas, are seen in contrast. Yes, sunspots are visible but are no longer the primary interest.
After many tries and failures at processing images to best show the chromosphere complete with prominences, I finally learned what some other imagers were using to process their images: Solar Toolbox — a package of programming scripts used with the PixInsight imaging application. I still have much to learn about Toolbox but it has already been enormously helpful to me in the challenging world of solar imaging! Thus, the image above is from very good data recorded about seven months ago, now reprocessed using Toolbox.
Monday dawned clear and bright so we set up the hydrogen-alpha (Ha) solar telescope and recorded some image sequences. Today was a dull and cloudy day so we spent some time learning new processing techniques for our solar imaging and were rewarded with our best shot yet. The processing of choice was Solar Toolbox — a script package developed for use in PixInsight software — just the set of tools we were looking for! We’ve a long way to go but we think this picture shows great progress!
Our temporary observing setups are assembled on the base/floor of the planned observatory. The light orange bucket, at center, protects an empty electrical conduit that will provide utility power to a permanent pier that will be installed there. In the foreground is a table supporting a light shield for the laptop computer. The large tripod next to the table supports the white light imaging scope. In the background is the Sky-Watcher SolarQuest mount with our Coronado hydrogen-alpha solar scope attached.
We’re still doing open-air astronomy though we have a nice, solid, clean, and level space to set up our gear! This is the setup we were using today to record the sunspot at active region 4079 as it is about to roll over the solar limb/horizon. Fortunately, though it’s a very temporary setup, the portable gear we use for casual solar imaging is fairly easy to set up.
From an unusual vantage point, a picture of the solar setup used today to record the passage of active region 4079 toward Sun’s horizon. The red object is the planetary camera.
We continued experiments to determine what gear will work together for imaging. There were a few surprises and there’s need for more experimentation. What we settled on for today’s solar efforts is pictured above and includes: Askar 103 APO telescope, Meade LXD75 Goto Mount, TeleVue 2X Barlow, Baader Planetarium Safety Herschel Wedge, and ZWO ASI678MM monochrome planetary camera.
The sun as it appeared at 11:32 AM EDT on May 10, 2025. Sunspot/Active Region numbers are labeled in this image with AR4079 very near the solar western limb or edge.
Although the sky was clear, seeing was a bit shaky so once again, sharpness wasn’t what we’d like. Still, in all, we got the shot we wanted and learned a few things about our astronomy equipment. Also, the sky was blue, the air was pleasant, and birds were singing, so not a bad way to spend a couple of hours.
A closeup view of the sunspot at AR4079. There is a bright line splitting the dark central umbra of the sunspot, the gray penumbra radiating in filaments around it. White cloud-like areas surround the sunspot, especially to its north; called plage, they are associated with areas of concentrated magnetic field.
The Sun, as it appeared on April 17, 2025, in hydrogen-alpha light. The image was recorded using a Coronado solar telescope, a Sky-Watcher SolarQuest mount, and a ZWO ASI 678MM camera. Photo by James Guilford.
Taking advantage of midday clear skies, Thursday, we set up the hydrogen-alpha telescope and did a little observing and imaging. Seeing conditions were only good but we could make out several prominences along Sun’s limb. (The proms did not record well and we need to figure out how to enhance their visibility in our images.) Most notable, however, was the shear number of filaments in Sun’s northern hemisphere. None visible in the south! Fragments of exploding filaments launched from Sun and produced two CMEs that, when they reached Earth on April 16, caused strong geomagnetic storm activity and widespread auroras. The storm, however, died out before northern lights could be seen here.
The Sky-Watcher SolarQuest mount is shown here aiming our Coronado 60mm hydrogen-alpha solar telescope at Sun.
Aiding in our efforts was a device we used for the very first time in this session: The Sky-Watcher SolarQuest with its HelioFind system. The device is lightweight, easily supported our rather robust Coronado solar telescope, and was exceptionally easy to learn and operate. Essentially, all that was needed was to set the tripod up so that it was level, turn the device on, and let it do its thing! It is powered by four AA batteries, placed inside the unit. As an alt-az mount, no counterweights or muliti-axis balancing was needed; just mount the scope with its balance point at the center of the dovetail clamp. No remote control, no app, the compact and self-contained SolarQuest established GPS contact, leveled the scope, then looked for Sun. The SolarQuest turned and elevated the telescope, quickly acquiring our nearest star. When the motion stopped, we looked through the eyepiece to discover Sun well within the field of view. A few nudges of the system’s adjustment buttons and Sun was centered. Tracking was excellent throughout the observing/imaging session. Provision is made for further refinement of tracking but that adjustment was unnecessary for the day’s activity. The SolarQuest will make our daytime astronomy a whole lot more convenient and enjoyable!
A business-class jet airplane trailing twin contrails is seen in silhouette against the roiling surface of the sun. The image is recorded in hydrogen-alpha light. Photo by James Guilford.
We had just finished setting up for some solar astronomy and tapped the button to begin a video sequence when something flashed across the computer screen. A jet appeared for less than a second, contrails briefly persisting, silhouetted against the roiling solar disk! We’ve only seen this twice while observing Sun, this being the second time, and we only captured this image by shear luck. The first time we witnessed a solar “photo-bombing” was under similar circumstances. Previously, we had completed setup, was refining focus, and just about to begin recording exposures. We missed imaging that encounter by about the same interval as we succeeded this time!