Another eclipse in the books

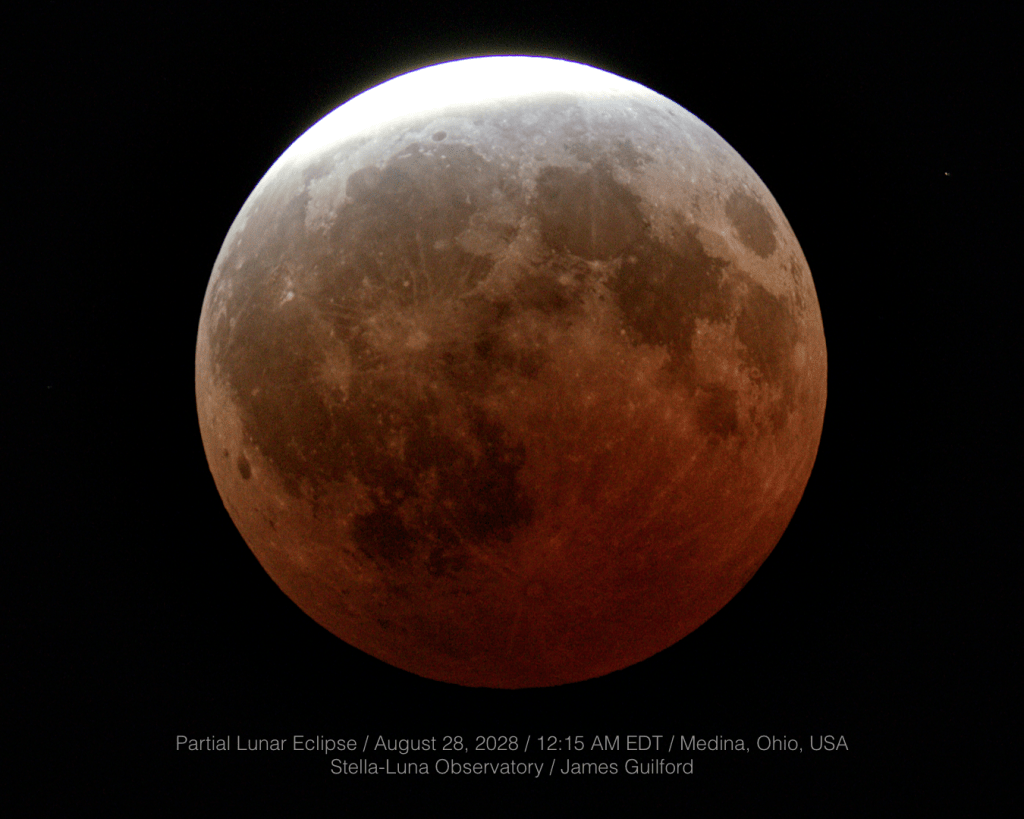
A stack of images taken two minutes after the eclipse peaked (delayed due to cloud cover) illustrates the approximate 96 percent eclipse. The brightest area at top is direct sunlight, the gray area beneath it is penumbral shadow, with transition to the coppery-colored umbral shadow where no direct sunlight reaches the lunar surface.

The August 27 – 28 partial lunar eclipse was enjoyable to watch but presented some challenges to photograph. Before nightfall, we set up a modestly sized telescope, the Askar 103APO, outside the observatory. The scope has a shorter focal length, less magnification, which would allow its camera to record the entire disk of Moon during the eclipse. The large observatory telescope, with nearly twice the focal length, would show less of the lunar disk because of its higher magnification. This outdoor setup seemed like a good idea and it was, in principle. But Moon and nearby trees presented our first challenge of the night.
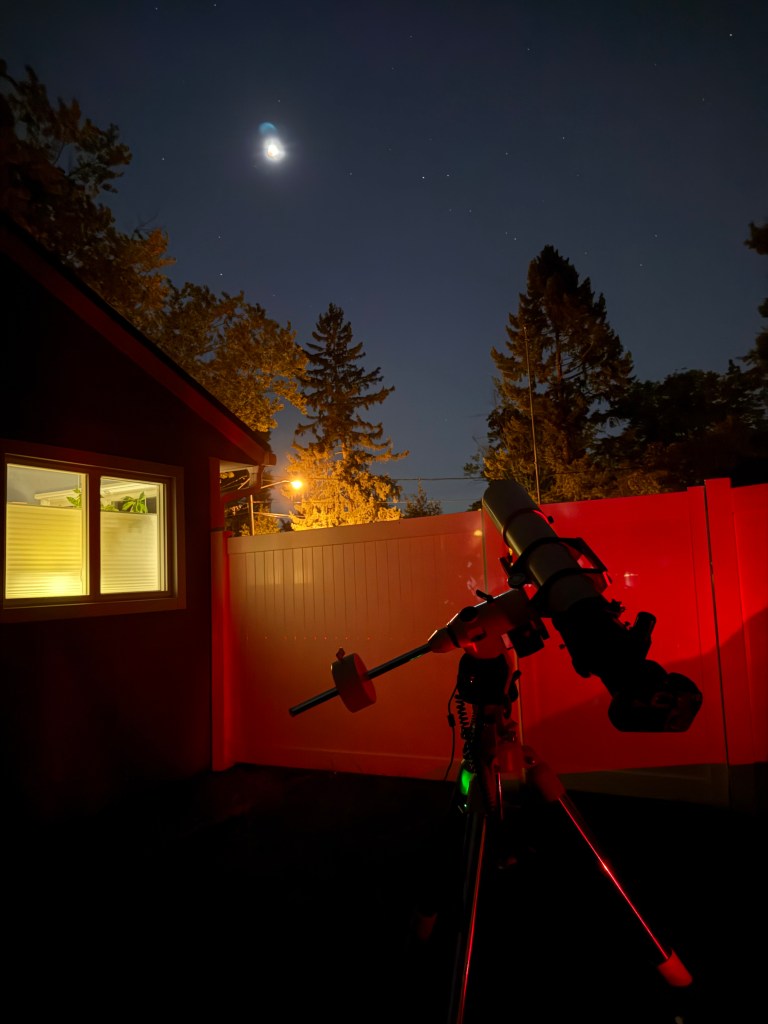
Trees blocked the view from the observatory so a telescope was set up in a more hospitable site. A 100-foot extension cord allowed utility power to run the telescope mount. A blue lens flare is visible above the bright dot that is Moon.

Moonrise was at 8:01 PM EDT and its altitude from the horizon was going to be fairly low. The mature neighboring trees are quite tall and wide. The combination was not good and, as Moon climbed higher and eclipse time approached, time was running out. From the vantage point of the telescope outside the observatory, Moon would be behind the trees during the entire first half of the event. We had to move it.

Scouting out a new location that allowed a clear view of the sky, we located one near enough to facilities to connect to utility electric power. In darkness we moved the imaging setup.

The dark umbra of Earth’s shadow was already taking a substantial bite out of the night’s full Moon as we finished setup at the new location. We were impressed at how well our old (ca. July 2005) Meade LXD75 mount performed, tracking accurately with minimal alignment; it was a real champ! One camera automation accessory did not function as expected so we removed it and ran the Canon EOS 7D Mk. 2 camera manually. Things went well from that point on with an unobstructed view of a clear sky and a darkening Moon. The night was quiet and mild, not even a jacket was necessary, as we gazed at the dimming Moon and listened to night sounds.

This was to be a partial eclipse, meaning not all of the lunar disk would be within the deep umbra — a bright sliver of sunlight would be seen at one edge, while the opposite side of the disk would be dark, and hopefully colorful. Peak coverage was to be reached at 12:13 AM EDT. It was about 20 minutes before peak when we spotted it: a bank of clouds drifting in from the north, illuminated by ground-based light pollution, headed in to spoil the night!
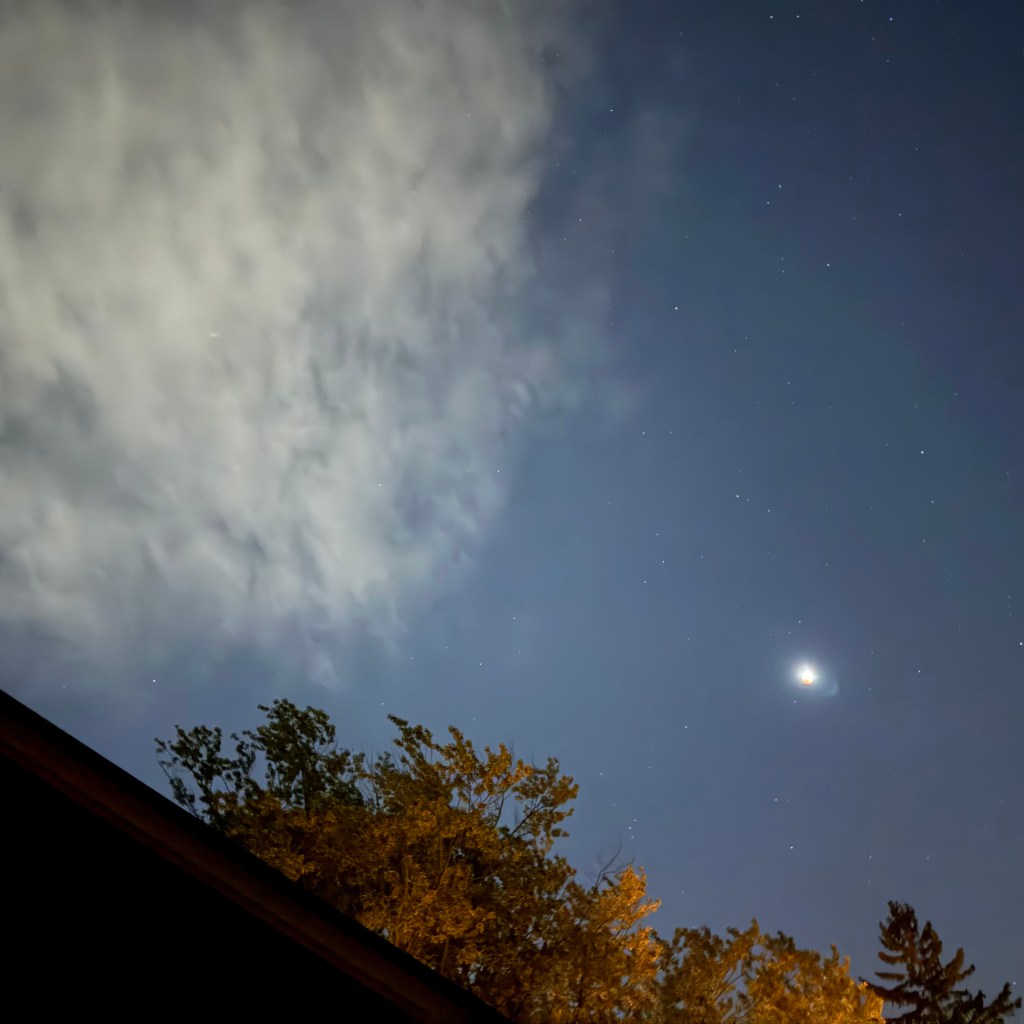
A bank of clouds approached the eclipsing Moon as the hour of peak eclipse neared. A lens flare is visible to the lower right of the bright lunar dot, and a view stars can be seen in the sky.

That is how it goes, sometimes. Clouds, missteps, or mishaps spoil an otherwise exciting occasion. It doesn’t help to curse the clouds but that did not help to stop the whispered oaths! Happily, gaps were present in the cloudy mess, clear sky visible through them, hopefully allowing peeks at the eclipse. The clouds arrived, mostly blocking but indeed occasionally teasing glimpses at the then fully-developed event. We made images from about two minutes before the peak, and images from about two minutes after, but nothing from the peak moment.
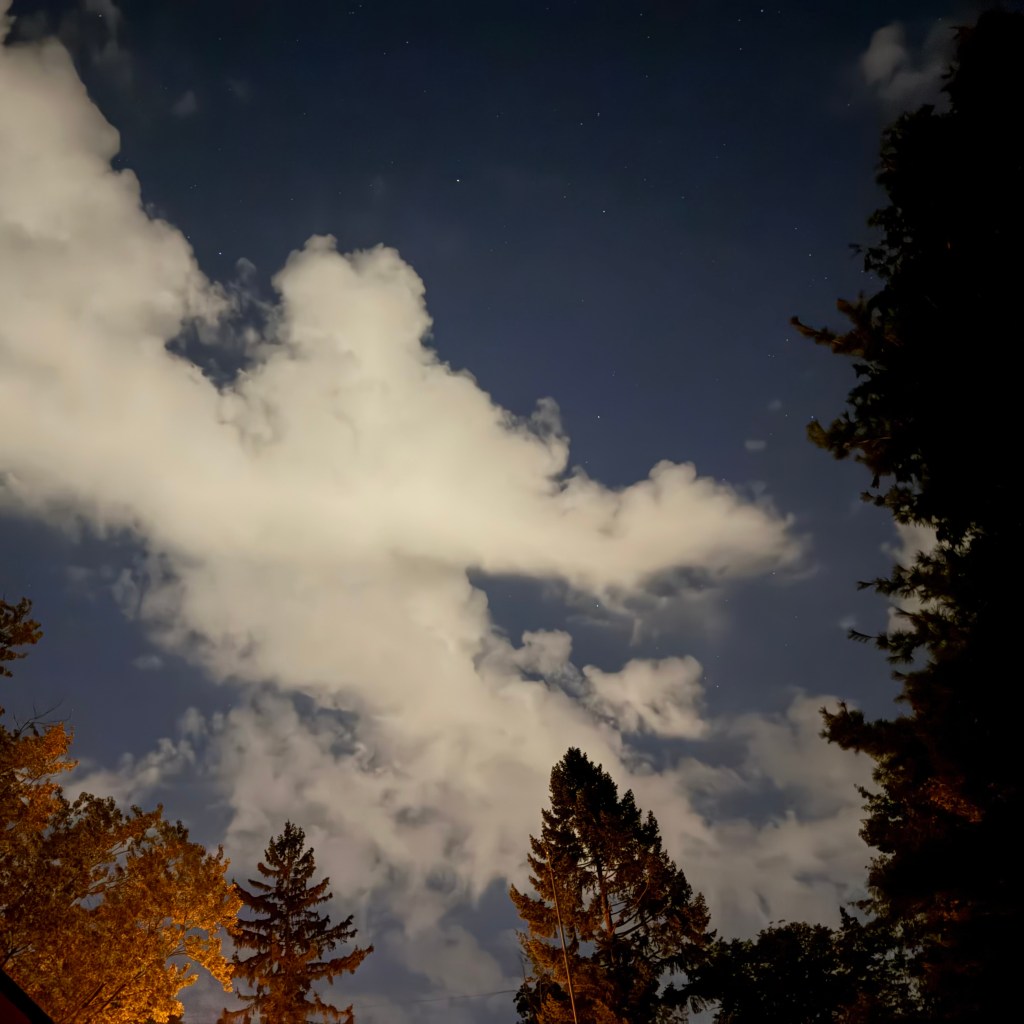
Peak eclipse, at 12:13 AM EDT. Very, very eclipsed as the clouds obscured the view. Gaps in the cloud cover allowed images to be made before and after the astronomical peak coverage was reached.

An extended period of clarity followed, as the cloud bank continued on its southbound journey. We shot more images of the eclipsed Moon, rapidly changing exposure settings, seeking to record a wide range of graphic data against future processing efforts before the scene changed much. Imaging done, we took one last look, parked the telescope, then stowed and secured gear for the night. It was late and we had daytime promises to keep.

So that was another lunar eclipse in the books. There was frustration, to be sure, but there were rewards. There won’t be another lunar eclipse visible here until January 12, 2028 (a weak partial eclipse), with the next total lunar eclipse on June 26, 2029. One has the opportunity to see just so many eclipses in their lifetime, so we try and see every one we can!

P.S. At 12:30 AM, the diminishing eclipse became visible from the spot where we first set up the small telescope. And the sky was clear.
A little flip helps a lot

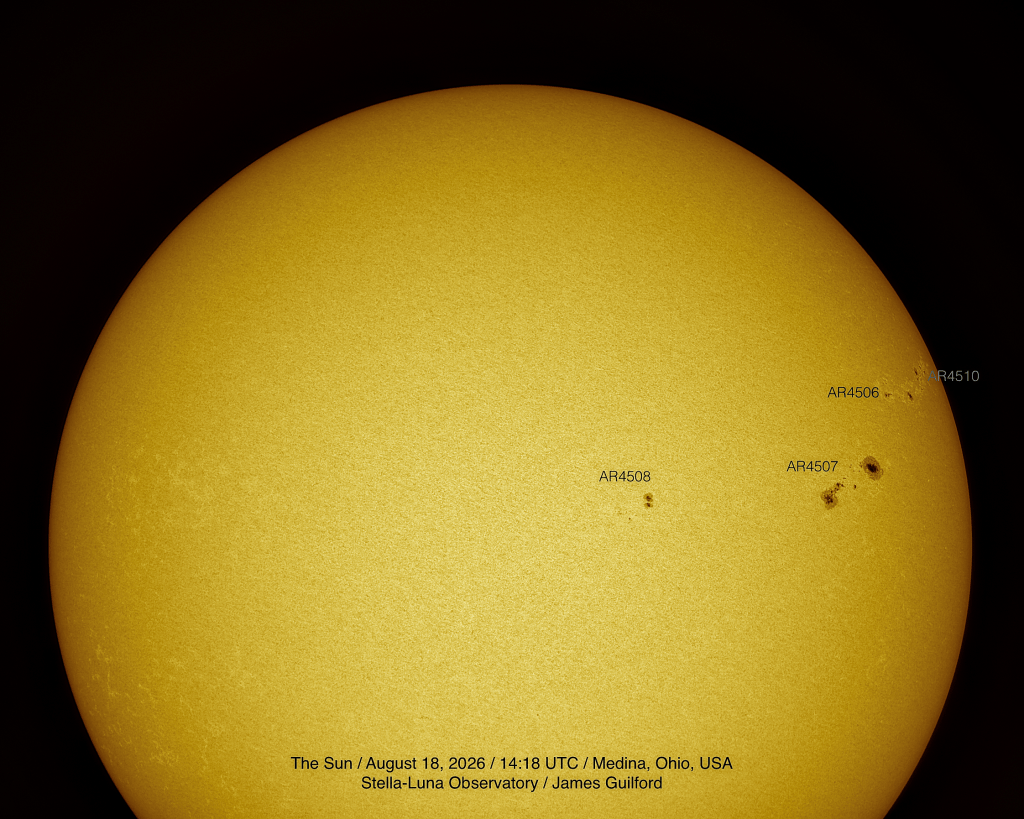
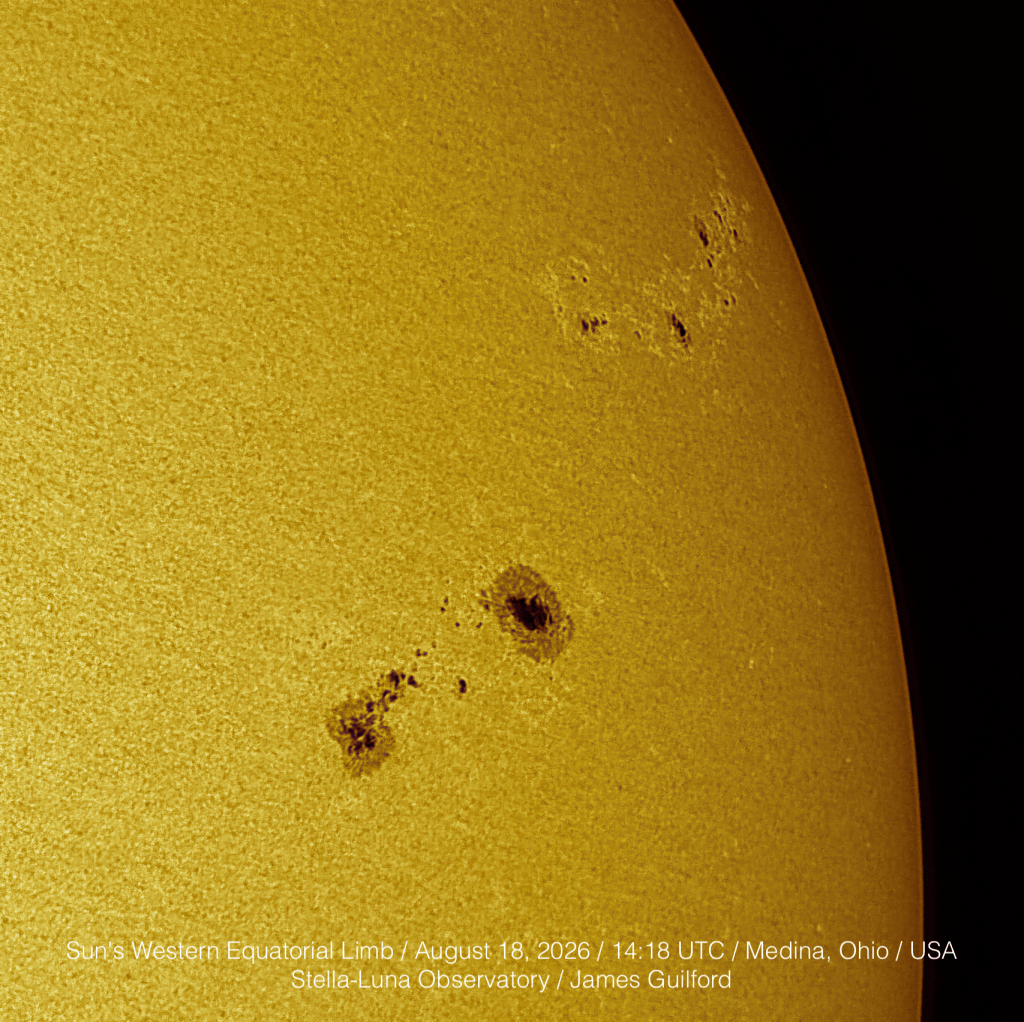
We observed several active regions, all in the western hemisphere, no sunspots in the eastern hemisphere, and all were confined to the solar equatorial area. This solar cycle appears to be fading away. White light Baader film solar filter, with false color applied in processing. August 18, 2026.

Skies, time, and tech finally aligned allowing us to observe Sun this morning. With mid-summer behind us, Sun clears the trees later these days meaning we observe later with more turbulent air — only fair seeing today! Still, we imaged four active regions with spots, all headed toward the western horizon. There were no sunspots in the eastern hemisphere, and the active regions were confined to the solar equatorial area. This solar cycle appears to be fading away.

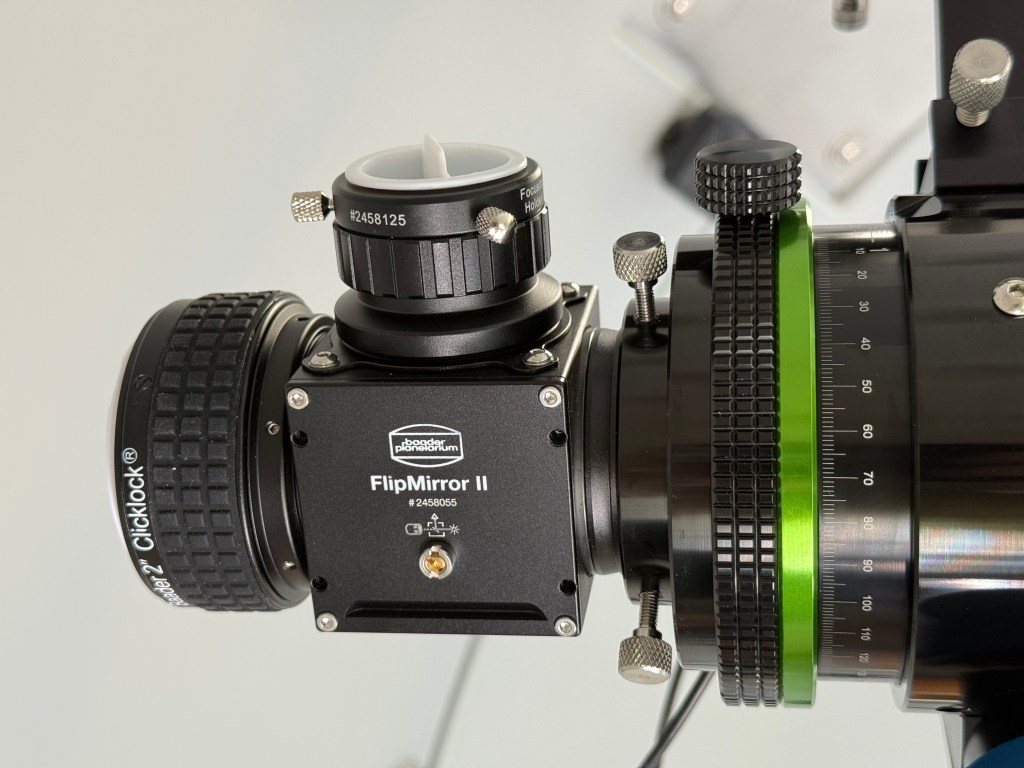
Aiding the day’s observations, and the equipment’s first light, was the addition of our new Baader Planetarium FlipMirror 2. We found that the flip mirror we used with the Vixen Cassegrain telescope had too much extension — we needed something more compact to achieve focus and have a little room for adjustment. Setting up the Baader FlipMirror was a challenge. The main component, containing the mirror, is shipped with adapter rings only — no nosepiece, eyepiece holders, or anything else. While the bare-bones component is versatile, selecting the correct set of add-ons was a worrisome exercise (components are not cheap) and the retailer offered no assistance when asked. After a good deal of shuffling between the owner’s guide, the product box illustrations, and the Baader and retailer’s websites, we made our selections. Happily our purchases were correct. The FlipMirror really is a well-made and even superior product.

The Baader FlipMirror 2 connected to the telescope focuser. Clicklock eyepiece holder/clamp, and focusing eyepiece holder are sold separately

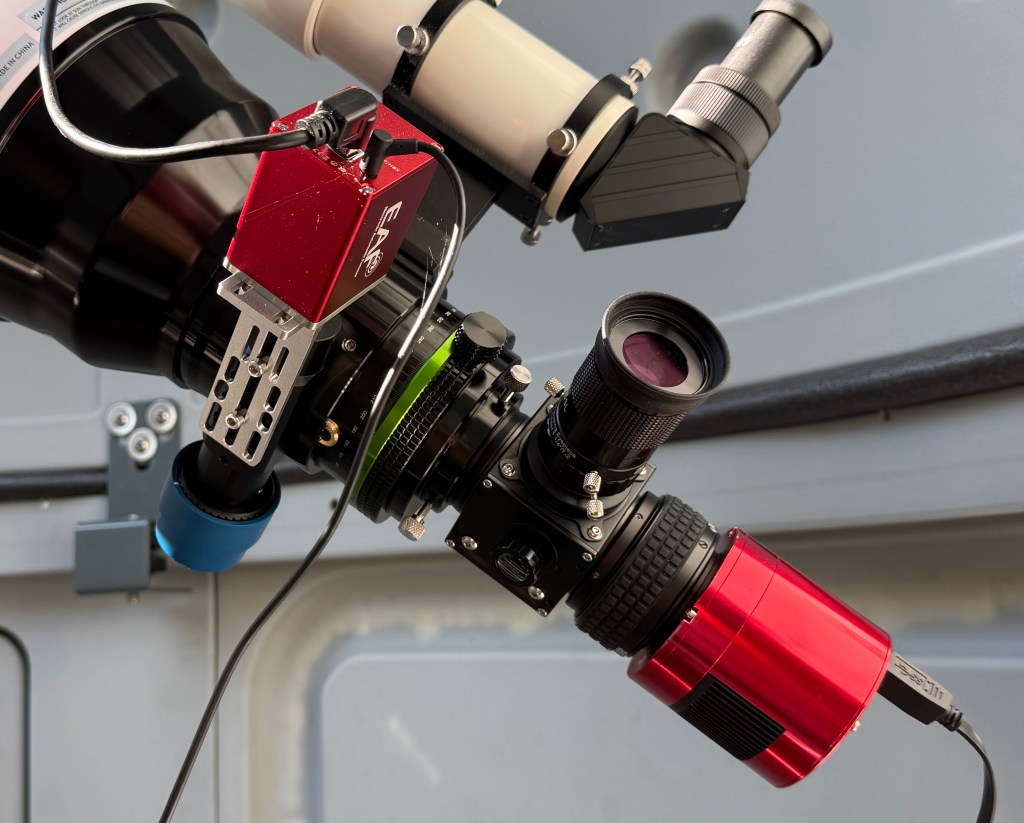
Why a flip mirror? Those devices allow two, or more, observation or imaging pieces to be attached to the telescope at once: a camera and an eyepiece, two eyepieces and differing angles, two cameras (we suppose), with only the twist of a mirror-flipping knob to switch between them. In fact, the Baader device has a third connection place, located on the underside of the mirror box, for addition of a guide camera! The mirror never covers the light path for an attached off-axis guide camera … an interesting feature.

The Baader FlipMirror 2 installed and in use with eyepiece and camera connected.

At any rate, we were able to easily center Sun in the field of view using the eyepiece, flip the mirror out of the way to allow a direct light path to the camera, and image. Centering the sun was no big deal but using an eyepiece to center distant stars, planets, etc. is made much easier through its use. It’s also nice to just take a look, observing directly with one’s own eyes!

First Light: A new telescope means a new beginning

First light image of Messier 57: The Ring Nebula. For the occasion, only 60 light frames and 30 dark frames, 15 seconds each frame, were captured and stacked. Affinity Photo 2 was used to create the stack and Pixelmator Pro for editing. M57 is a planetary nebula in constellation Lyra and was formed during the death throes of a Sun-like star.

We had been considering what our next step might be in outfitting the observatory with a more-or-less permanently mounted telescope. Would a very long focal length Cassegrain suit our needs? Both the C11 SCT and the Vixen Modified Cassegrain were available, already on hand but both had issues. After struggling with collimation on both telescopes, we were leaning toward a high-quality refractor as the solution. Long focal length on a refractor, though, means a long tube and we have limited space. The incident that damaged the Vixen pretty much forced our hand. Frustrated with collimation issues, and telescope repairs we doubt we could perform, we made the decision to go with a new refractor.

What ultimately steered us toward Askar and helped ease some (not all) doubt concerning focal lengths was the wonderfully high quality image of the “daytime Moon” we had captured with the smaller Askar 103APO — images with that level of quality can be cropped to make up for some lack of focal length. Watching YouTube reviews of some Askar’s bigger telescopes offered further assurance we were headed in the right direction.

The new Askar 151PHQ telescope installed on the observatory’s pier. At the eyepiece end is a ZWO ASIAir Plus computer and ZWO Automatic Electronic Focuser. We anticipate moving the computer to a different location on the telescope as cable management becomes a priority.

Inside doubled shipping boxes, the telescope was delivered in a solid transport case, packed in form-fit dense foam padding. The case is very high quality, very heavy, and bears multiple hand grips; it will now be set aside, stored some place against the day the telescope is taken out of service for some reason. If the case was an optional item, in our case we aren’t sure we would want it.

The Askar 151PHQ is doubtless the highest-quality telescope we have ever owned or used. It is a quadruplet astrograph, featuring a 151mm (six inch) aperture and a 1057mm focal length for an f/7 focal ratio, and designed to produce flat field images without add-on optics.

Taking advantage of a rare, relatively clear night, we went for first light using the big instrument with minimal configuration: no finder scope, no automatic tracking, no camera cooling, etc. While we had installed the ZWO AEF purchased years ago, and the ASI AirPlus, we used them only for manual electric focusing which, by the way, was a big improvement in itself! The optional hand controller was a wonderful thing to have, allowing us to watch through the eyepiece or on the computer screen and make smooth, minute adjustments to focus without telescope vibration. Yes, wonderful!

Under Bortle 6/7 skies pinpoint stars shown brightly through the eyepiece as we focused on Arcturus, then searched for M57. Our hazy skies, made worse by light pollution (maybe a Bortle 8 night), didn’t make things easy but with a little patience, a tiny, ghostly ring appeared in the field of view. We swapped out the eyepiece for the one-shot color camera, refocused, and began the imaging run. While we have much to learn about processing deep sky objects, we were happy to see the quality of the resulting stacked image: round stars and lots of them (many more stars than we’re used to seeing there), good detail in the ring, and decent color — all in 60 light, and 30 dark 15-second frames. The Moon eluded us that night, still down in the trees at midnight, but we tried solar first light the next morning.

First images of our Sun via the Askar 151PHQ were recorded under poor seeing conditions but, with some work, produced some pretty impressive results. A TeleVue Powermate 2.5X Barlow was employed here. We hope to refine our setup for the new telescope for better edge-to-edge focus. The telescope was equipped with a Baader white light solar film filter and monochrome camera; false color applied during processing.

Placing a Baader Solar film filter over the Askar’s objective and aiming the scope at Sun, we quickly saw beautiful detail in the sunspots that marked the surface on July 31. Imaging was routine and easy, though seeing was poor. The telescope’s 1,057mm focal length did not allow a full disk image of our star on the ASI astronomical camera’s sensor but installing a Barlow lens we achieved some dramatic detail views. We can hardly wait to try again under better skies!

Long focal length produces a Solar image too large to entirely fit on the astronomy camera’s sensor. With quality like this, however, we won’t complain. This is Sun on July 31, 2026, imaged via white light solar filter and monochrome camera, false color applied during processing.

Nearly too large! When observing low elevation targets, the telescope fits snugly within the observatory walls. Fortunately, the tall pier and large mount elevate the assembly enough that normal observing is at a comfortable height and (M57 was at the zenith during First Light!) high elevation targets do not cause us to lay on the floor or scrape the camera there! We suspect this scope on a tripod might present some problems for high elevation object observing.

Thus far the only negative, something unanticipated, is that because of the Petzval design, an optical element is located deep within the OTA making use of our beloved Herschel Wedge a risk to the telescope; that optical element is at a point in the light path where focused and unfiltered sunlight could overheat and damage the lens! We’re working around it and will assign the Herschel to the Askar 103 when desired. As we anticipated, we’d love to have much more focal length but without collimation to worry about and high quality images to work with, we’ll hope to get by … maybe with the help of a really good Barlow lens?

Sun and Moon

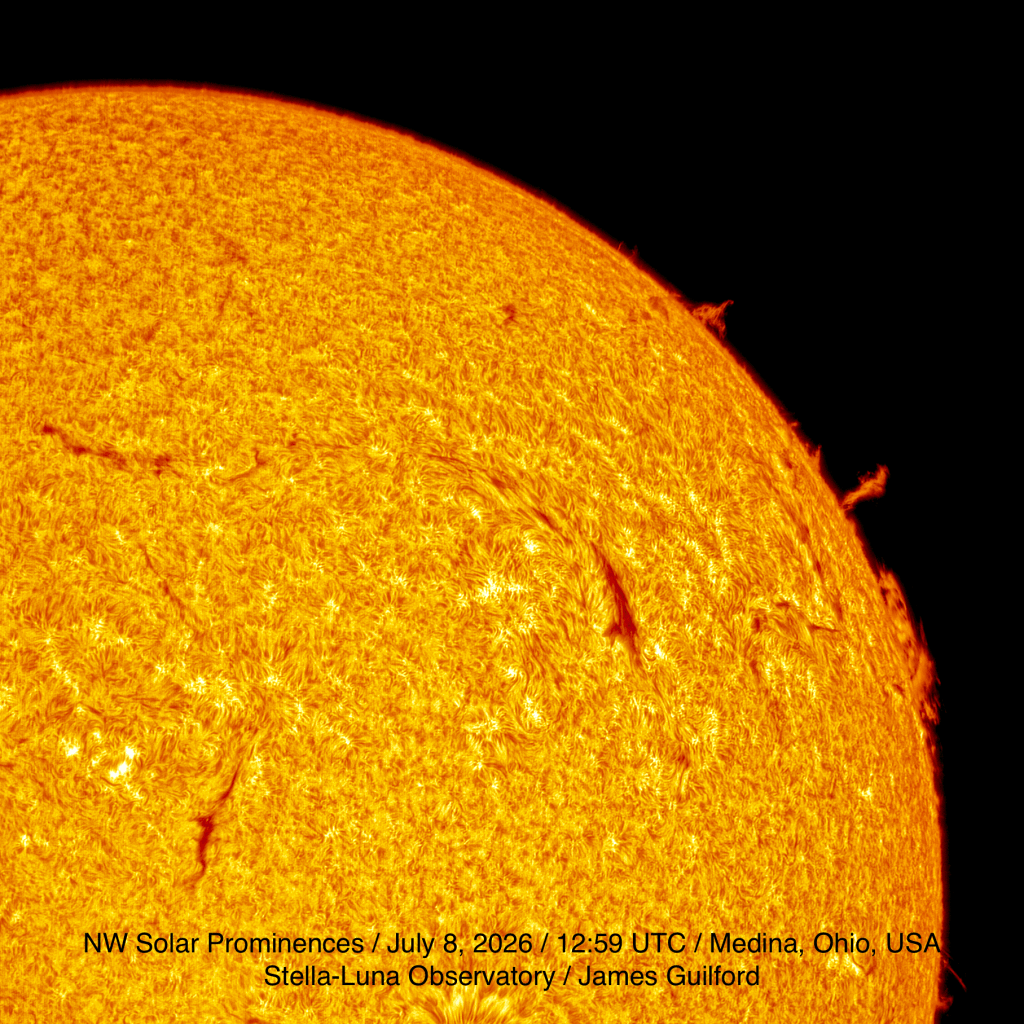
The northwestern Solar quadrant shown via hydrogen-alpha light, false color applied, shows the chaotic surface of the chromosphere, with several filaments visible. Along the rim are prominences contrasted against the blackness of space.

The morning presented an excellent opportunity for Solar observing and imaging — the sky was clear and, these days, Sun is rising between trees instead of behind them! While we have been following our star’s singular large sunspot for a few days, it turned out our best image from the morning was of the northwest Solar quadrant. Details in the chromosphere were beautifully rendered and several interesting prominences of various shapes and sizer graced the rim.

During one of the Solar imaging runs, we looked up and out through the dome aperture at the deep blue morning sky. There, floating on the denim background, was the Last Quarter Moon. Once finished with Sun, we aimed the scope at Moon, removed the solar gear from the white light telescope, and did a portrait of old Luna. We’ve done this not so long ago but still get a kick out of our daytime Moon.

Earth’s Moon in its Last Quarter phase is shown in this two-panel image made at 9:15 AM EDT, July 8, 2026.

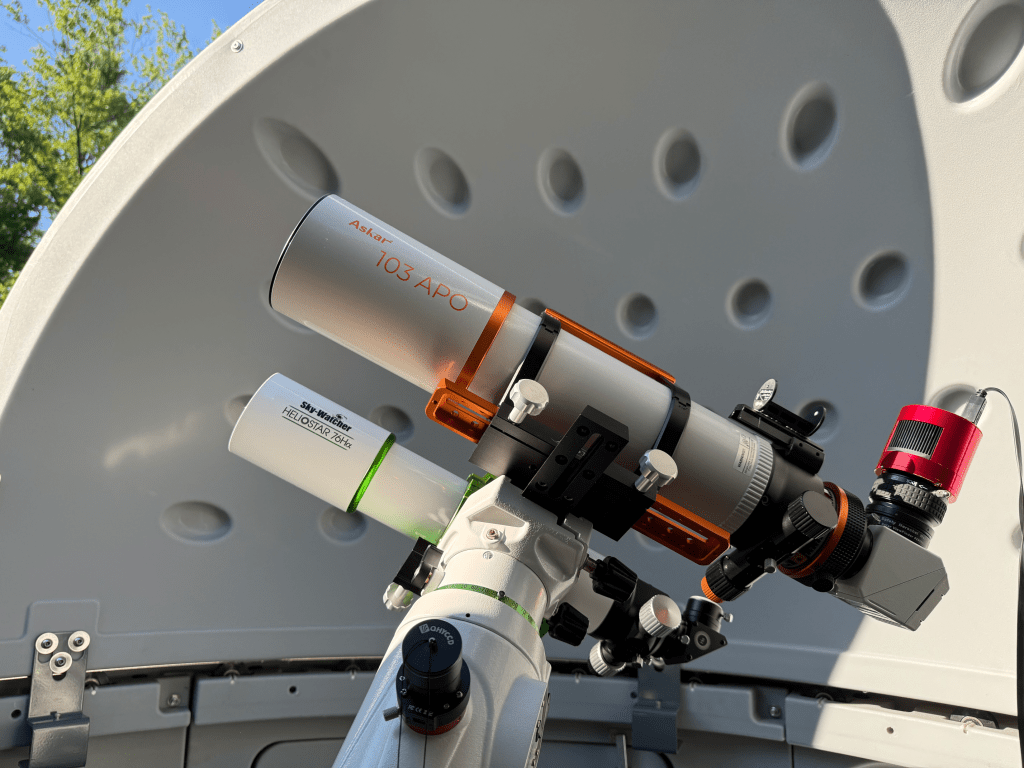
By the way, the latest addition to our setup is a rig by ADM that allows two scopes to be held simultaneously on a single mount; that has been a wonderful way to quickly change between Solar wavelengths, and to use the individual telescopes without swapping out and rebalancing the system. The ADM rack is very well made, fully adjustable, and we have no fear of equipment coming loose and crashing to the ground — possibly the most important feature!

Multi-telescope rack by ADM allows two telescopes to ride the pier mount at the same time, delivering flexibility and efficiency to our setup.

Lunar Blueprints

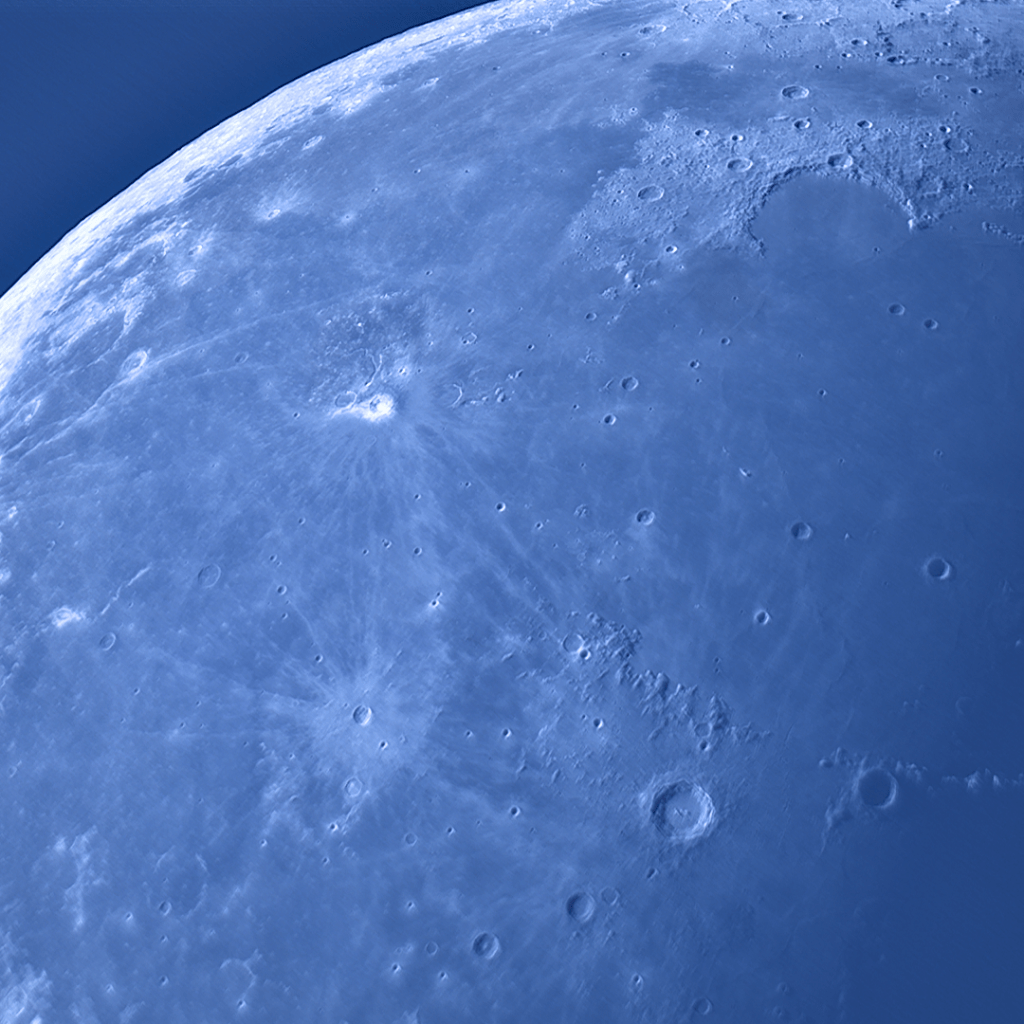
This morning, before stowing equipment for the duration of upcoming days of cloudy weather, we aimed the 11-inch scope at Earth’s waning gibbous Moon. Images were captured at about 7:50 AM EDT, after the sky had turned to blue, lending its color to Moon as viewed from Earth.

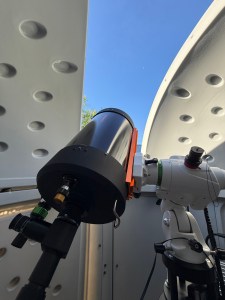
Celestron 11-inch telescope is shown aimed at Moon — a tiny white dot — in the clear, blue morning sky.

The big Celestron SCT remains in need of adjustment or, possibly, overhaul but does deliver some pleasing results! We’ve been struggling but have not yet achieved best acceptable collimation, so the scope hasn’t spent much time on the permanent pier in the observatory.

The sort of flaw that one will see from telescopes that are out of collimation — alignment of the light path within the telescope — is stars that look a bit like comets, and focus difficulties. After several efforts we are not where we need to be with the C11 to use it as our primary observatory instrument.

Unfortunately, due to lack of space, we can have only one telescope at a time on a permanent mount beneath the dome. We are considering next steps which include acquisition of a new primary telescope, upgrading of the mount, and means of mounting two instruments at a time on the pier.

As mentioned, cloudy, rainy weather is expected to be the rule for the week ahead so the telescope is parked, and accessories stowed. We’ll be working a bit on our meteor camera and thinking about where to go from here.

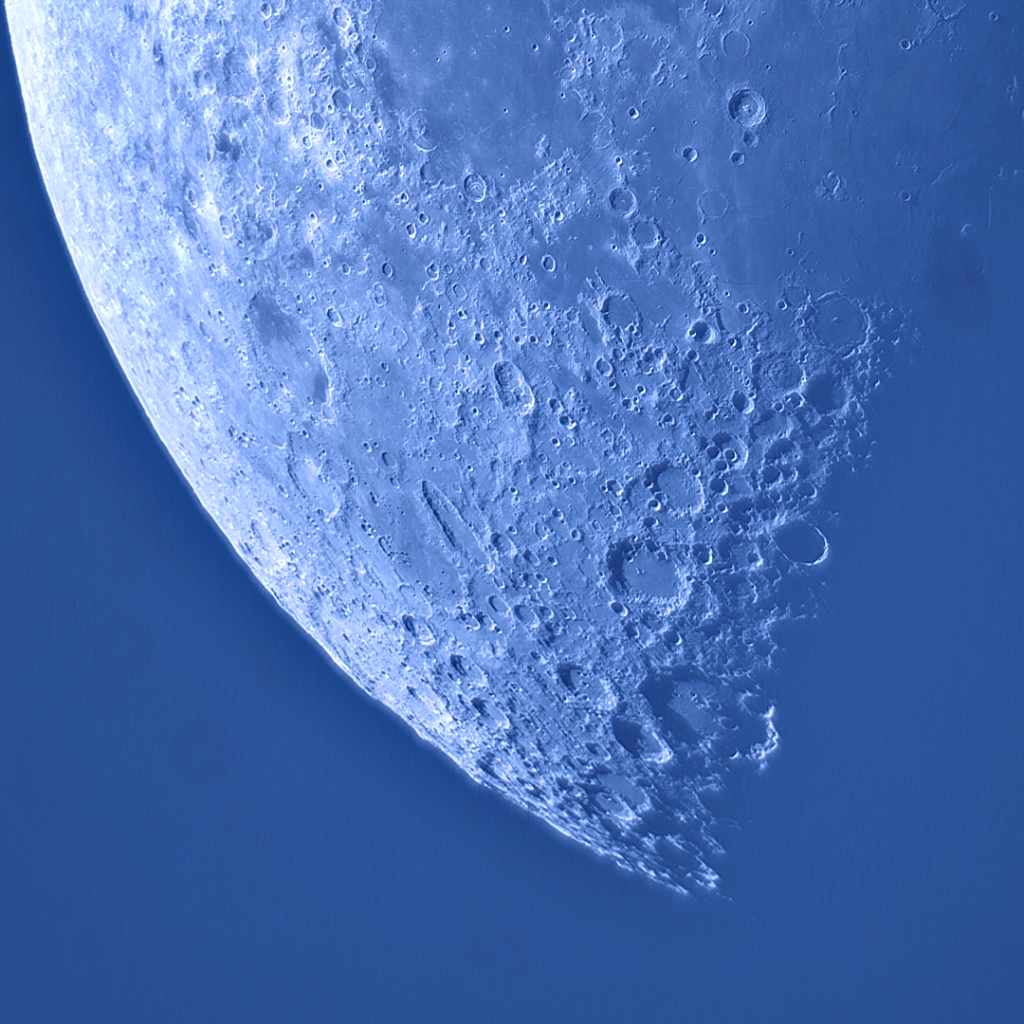
Our favorite image from the morning’s “Daytime Moon” efforts shows Moon’s heavily-bombarded southwest quadrant: craters, within craters, within craters. As with the other blue sky image shown here, this one is darker and more vivid than its actual appearance; we couldn’t resist giving the picture a bit more “snap” to bring out detail.
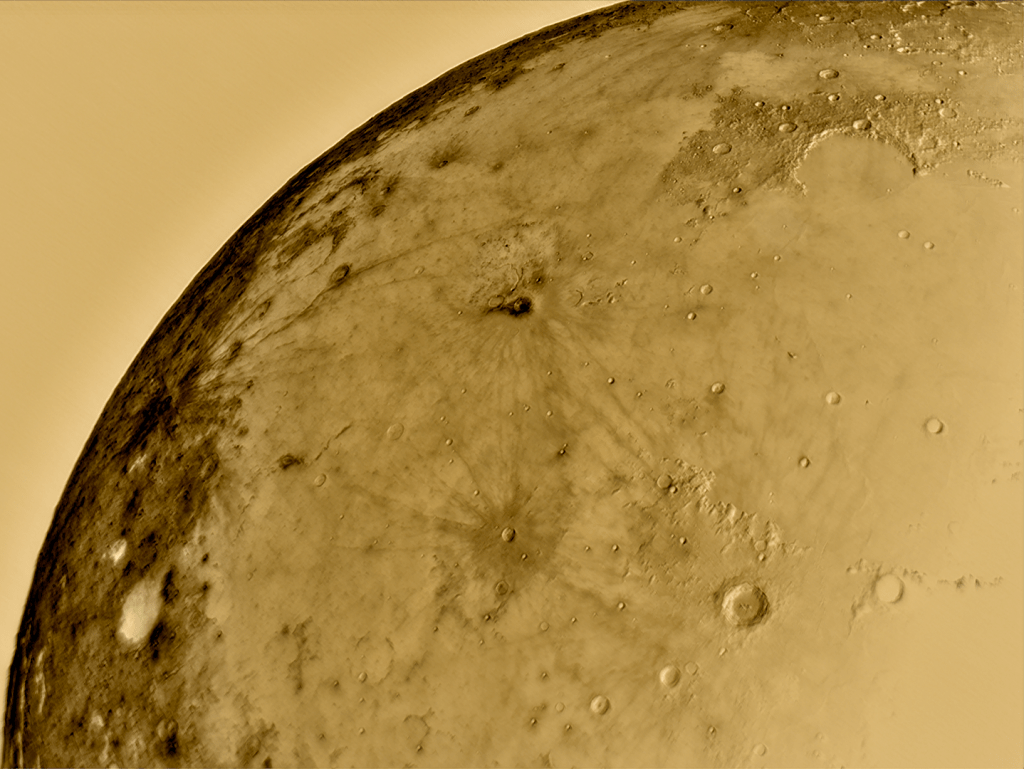
This image of the northwest quadrant of Earth’s Moon shows the image as a photographic negative — amber in color, not blue as in a previous post. Ejecta rays are especially visible around Crater Kepler, near the center of this picture. We enjoy images like this because they feel like a throwback to the early days of astrophotography, and because they tend to reveal delicate details — I mean, just look at the ejecta rays around the craters, especially Kepler just below center of this picture.

We captured a filaprom!

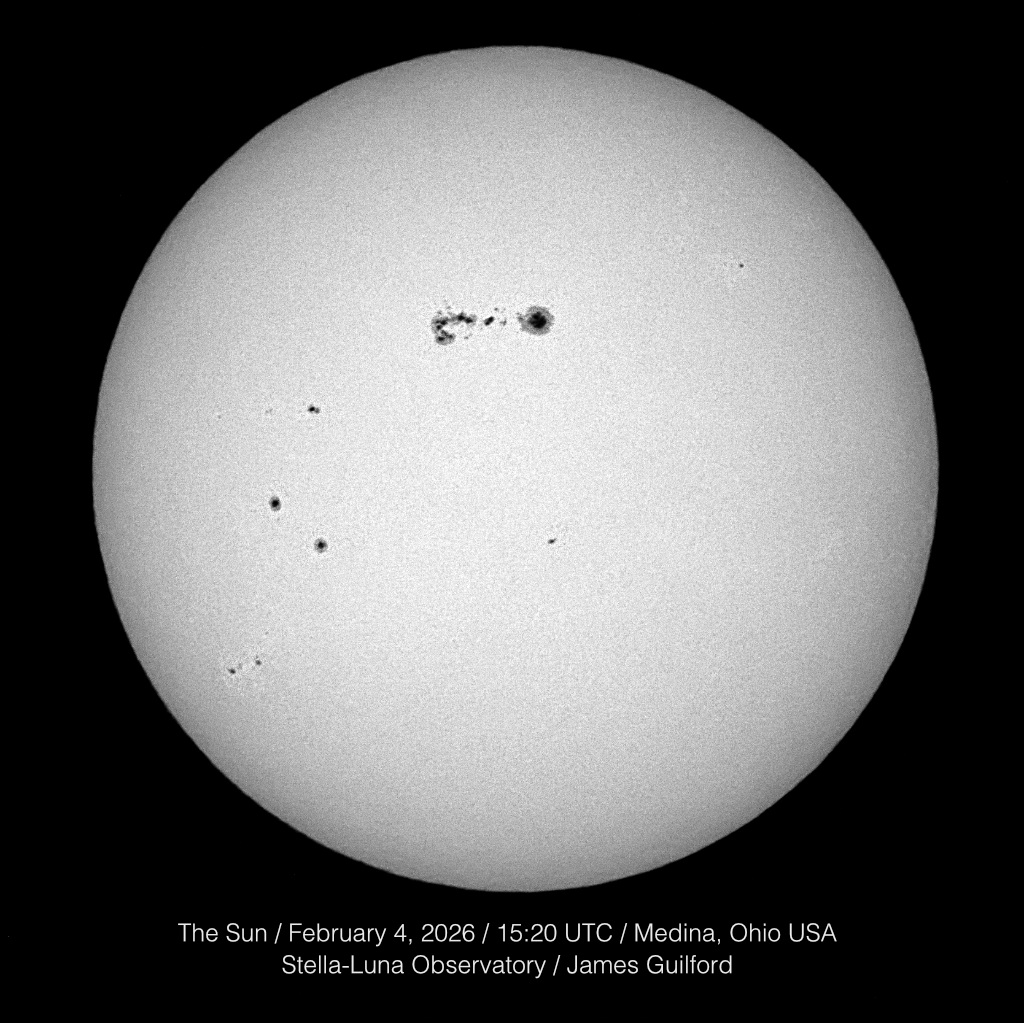
Shown in white light is our Sun as it appeared on February 4, 2026. A large sunspot, designated Active Region 4366, drew much attention as it transited the surface, issuing flares along the way.

On sunny days, this winter, when it’s not bone-shatteringly cold, we’ve been imaging Sun. In white light, we’ve tracked the progress of a couple of impressively-large sunspots as they traversed the Solar photosphere, including one designated Active Region 4366 that drew global attention in late January and early February 2026. We’ve also been observing in hydrogen-alpha (Ha) light.

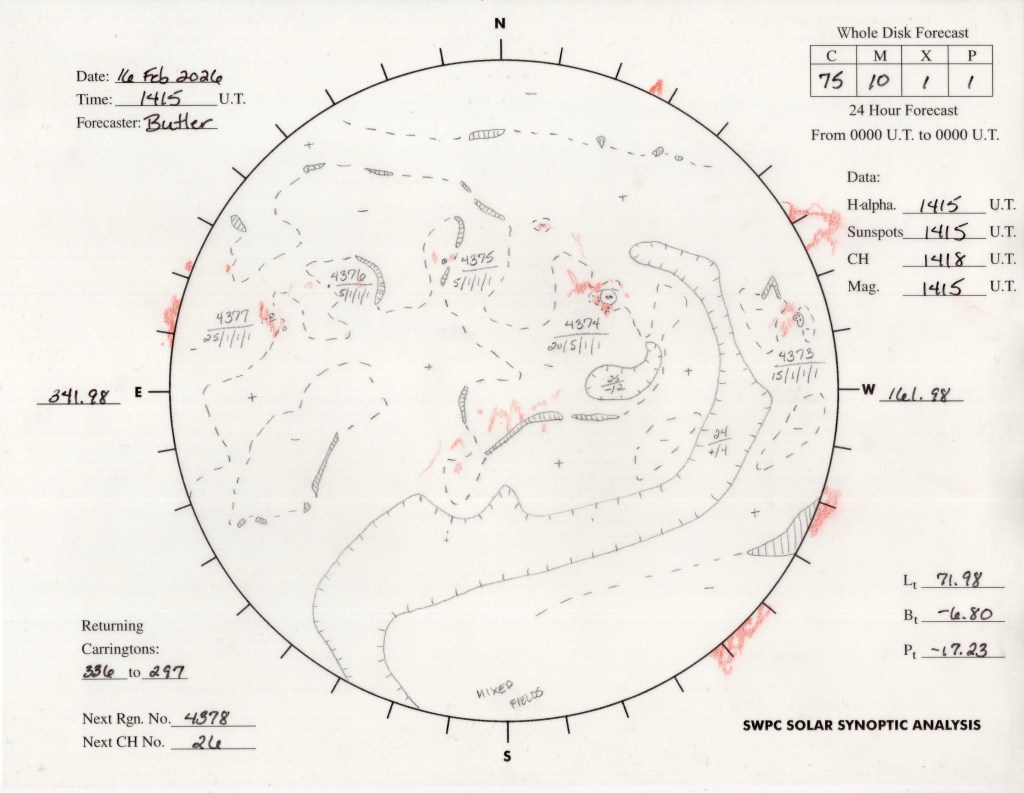
The NOAA SWPC Solar Synoptic Analysis map showing Sun on February 16, 2026.

On sunny February 16, we checked the NOAA Space Weather Prediction Center’s daily Synoptic Analysis map for targets of interest. Yes! The map indicated several prominences around Sun’s rim so, a great day to see what was out there.

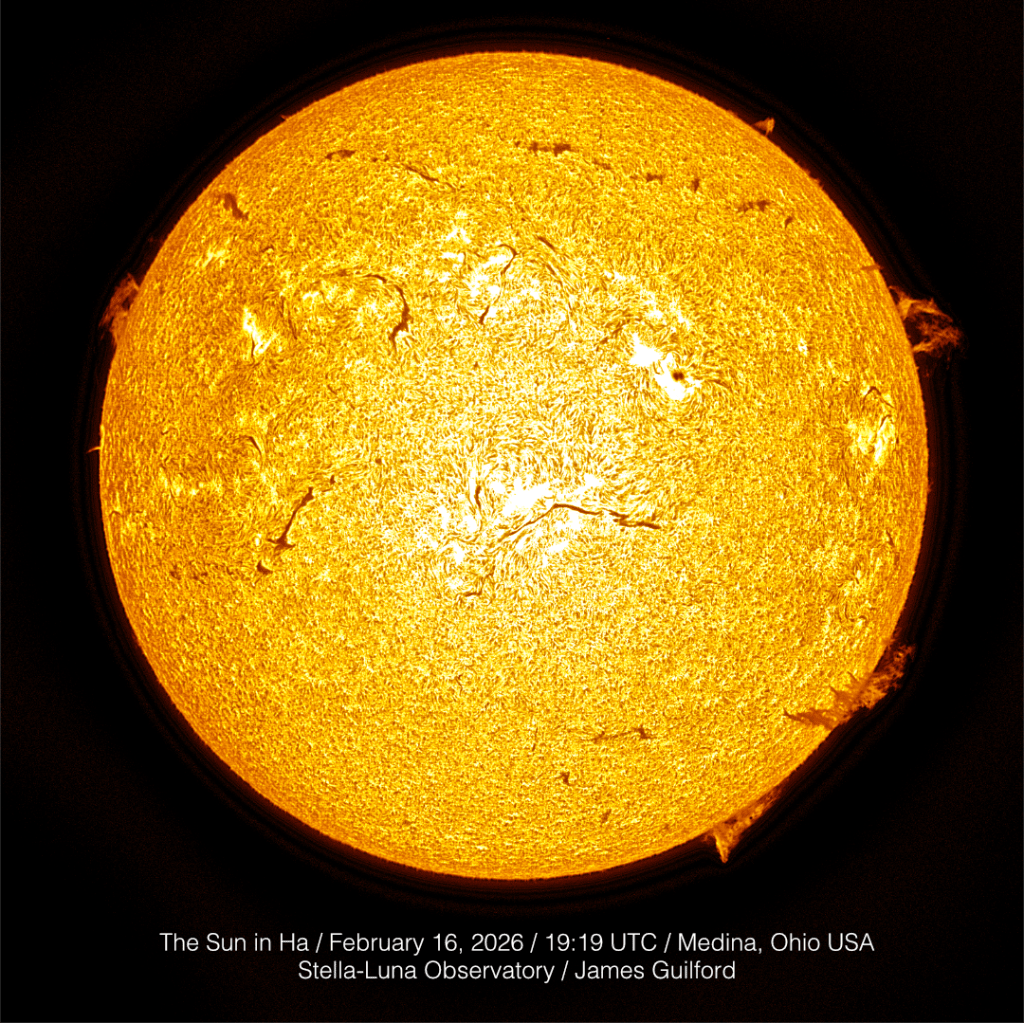
The full-disk image of Sun as it appeared in hydrogen-alpha light. This is a monochrome image original with false color applied. The “filaprom” is located at about the four o’clock position on the disk.

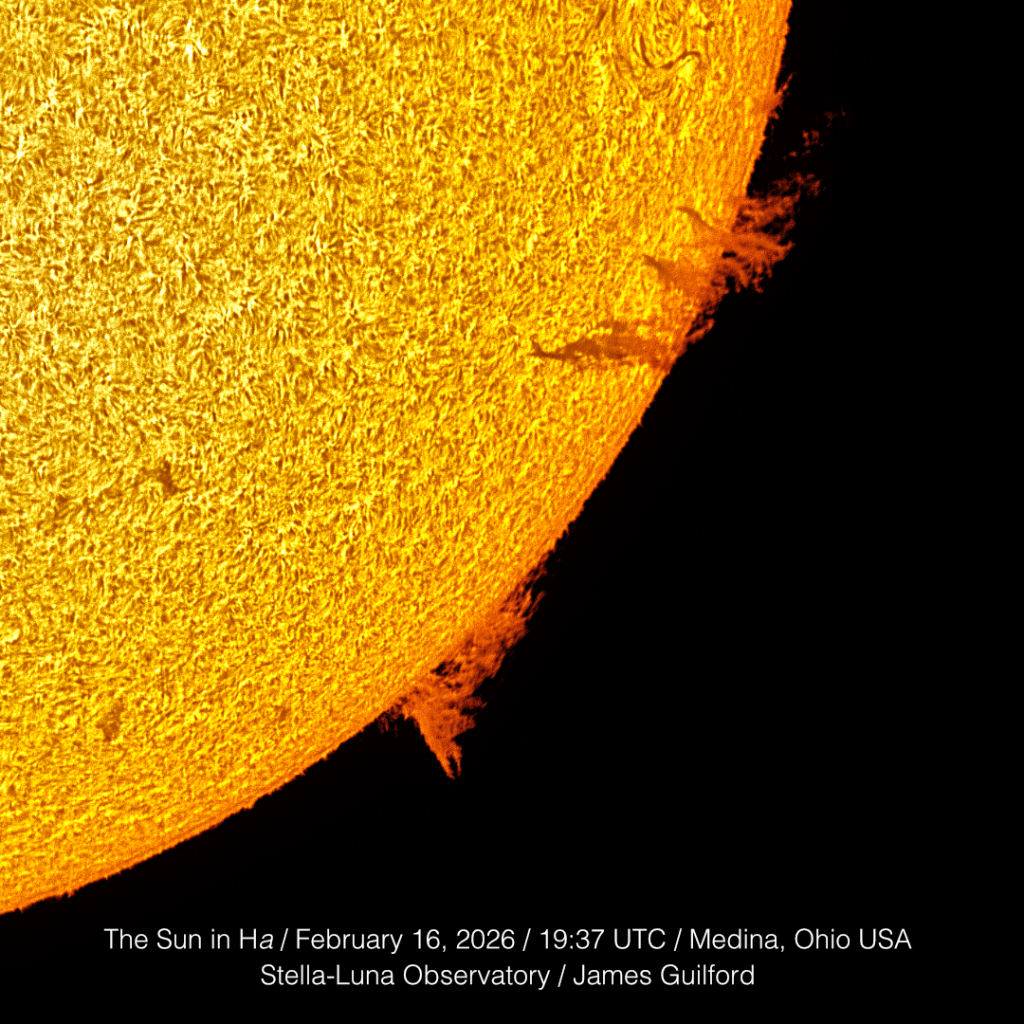
While an arch-shaped prominence at about the two o’clock position was our original target, as soon as we looked through the telescope’s eyepiece we saw it — a filaprom! What’s that? The snake-like features that appear in Ha are called filaments. If a filament bridges the Solar limb, its true nature is revealed: it’s a prominence, appearing as a dark filament when viewed against the bright chromosphere, and as a bright prominence when contrasted against the blackness of space — a filaprom! It was a first for us and delightful to observe!

Close-up view of the filaprom, near the top of the arc. Lower on the curve is a prominence issued from a position just over the Solar limb. Near the left-hand portion of the frame is a filament feature — a prominence viewed against the bright Solar chromosphere.

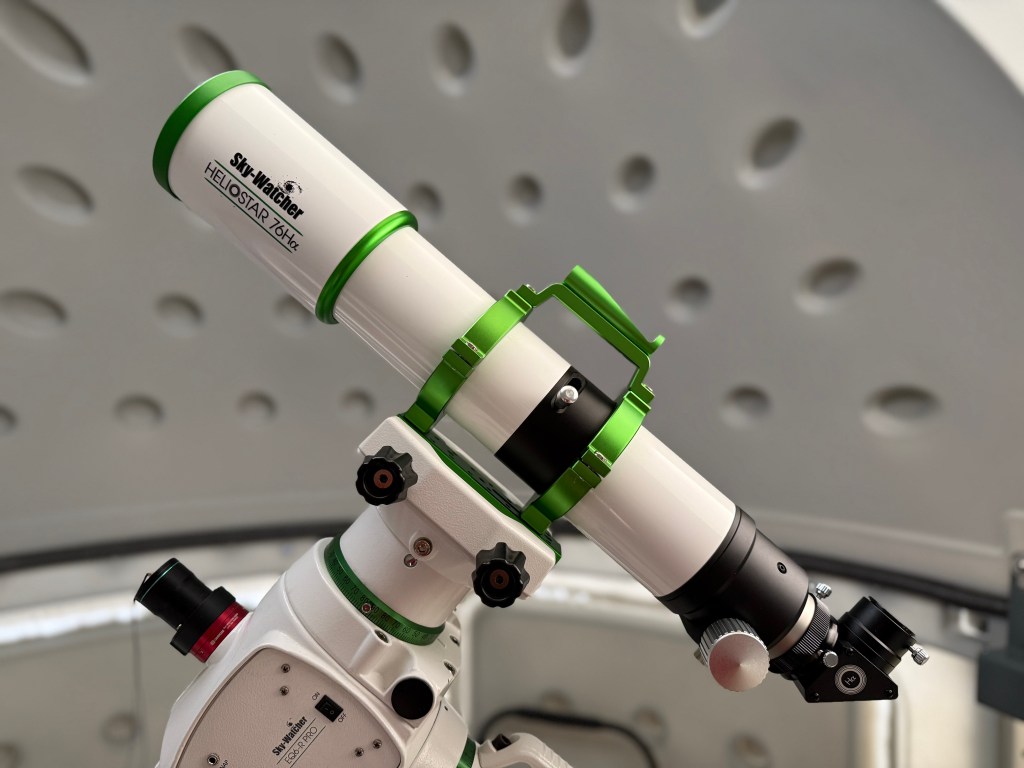
Improvements in instrumentation and processing skills helped with both the capture and depiction of our nearest star’s activities. We recently upgraded to the relatively-new Sky-Watcher Heliostar 76Ha telescope and that has made a huge difference in visualizing the chromosphere. The telescope’s filtering system, with a “single-stack” arrangement, is capable of 0.5 Angstrom or better which really brings out detail — stronger image “signal” produces image data that are easier to process and edit. More about the telescope another time.

The Sky-Watcher Heliostar 76Ha telescope in its parked position beneath the observatory dome.

A break in the weather allows view of an active Sun

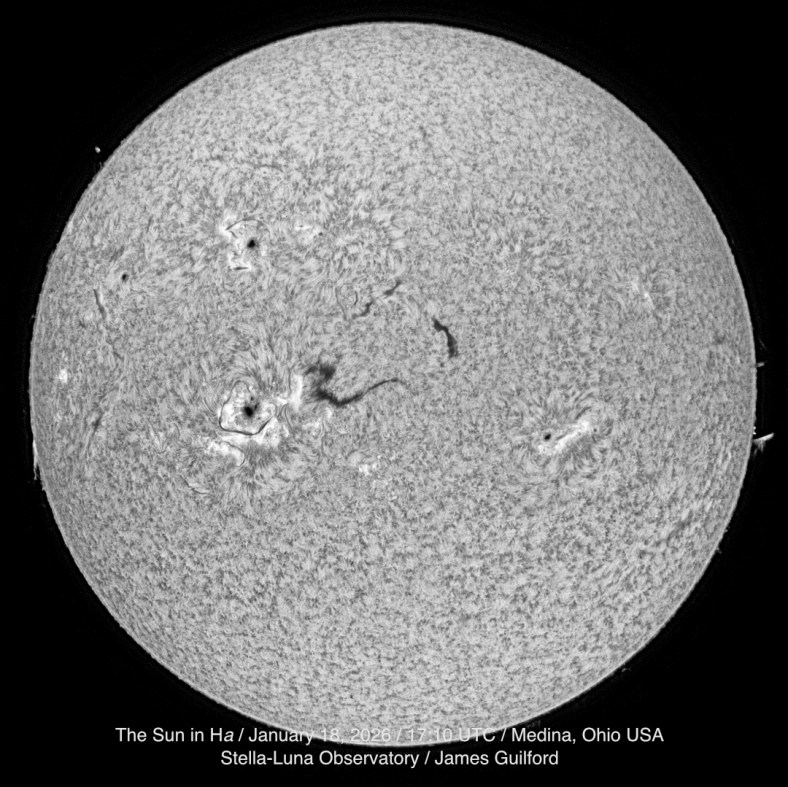
Full disk image of Sun as viewed in hydrogen-alpha light. Snake-like, dark filaments grace the center of the image. Several sunspots are also noted. Dominant in its influence on surrounding plasma features, is Active Region 4341 which exploded with a powerful flare one hour after this image was recorded.

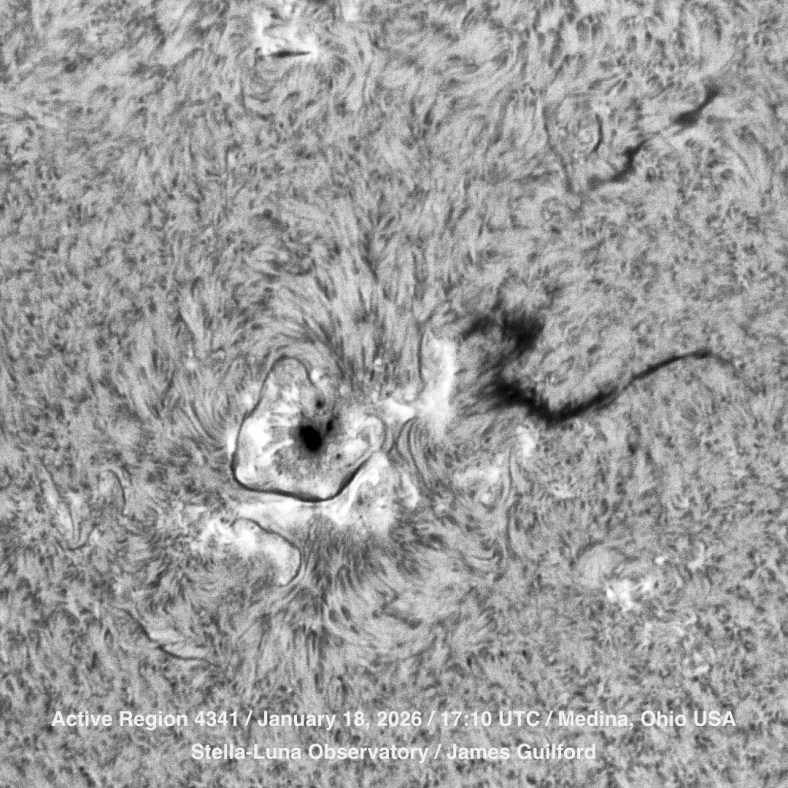
With recent weather, we believed the observatory might be closed until spring. On January18, however, the skies were clear and blue with very little wind. We unsealed the dome, brushed off some of the accumulated snow, and aimed at Sun. The first thing we observed was the presence of large filaments at the center of the disk. One filament, Z-shaped, was in immediate proximity to a large sunspot at Active Region 4341. Also visible were multiple prominences around the disk; Sun is still active! The powerful magnetic forces surrounding AR4341 are made evident by its influence upon Solar plasma — twisting and aligning the visible features like iron filings around a science classroom magnet.

A close-up view of Solar Active Region 4341, in hydrogen-alpha light. Snake-like, dark filaments grace the center of the image. Several sunspots are also noted. Dominant in its influence on surrounding plasma features, AR4341 exploded with a powerful flare one hour after this image was recorded.

While the sky was clear and blue, the temperature was wicked cold for standing around on stone floors. Also, touching metal telescopes, properly allowed to reach the ambient temperature of 19°F, with bare hands is, painful. The laptop computer also found the temperature uncomfortable for, while its battery was charged to about 60% capacity, the system quit complaining of low battery. Attaching the computer’s charger let us finish the session.

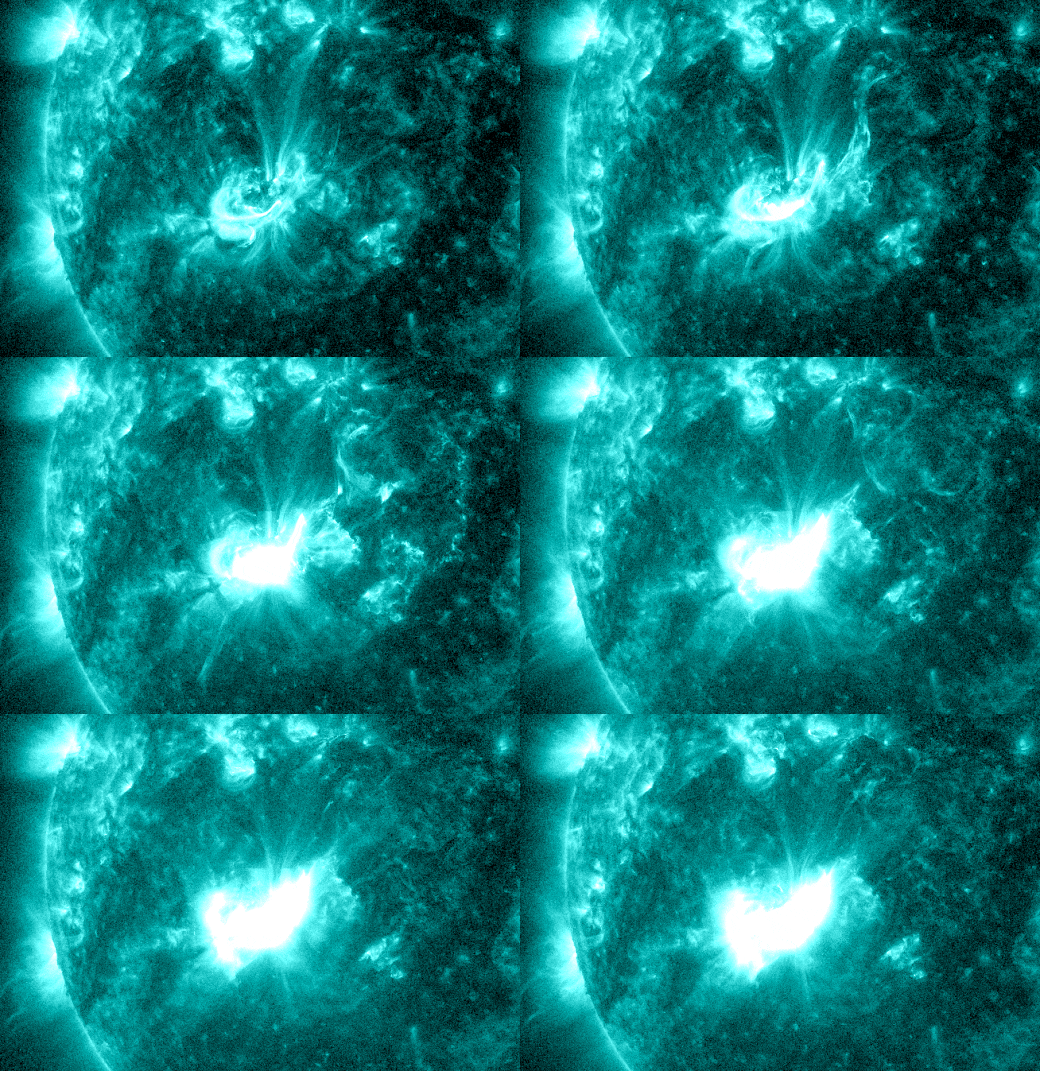
Video from NASA's Solar Dynamics Observatory spacecraft, showing the X1.9/3b flare at AR4341. -- January 18, 2026. The Solar image appears in shades of green with black background. The flare is at the center, in white, as it expands during the explosion.
Video from NASA’s Solar Dynamics Observatory spacecraft, showing the X1.9/3b flare at AR4341. — January 18, 2026

One hour after we recorded the images of AR4341, the sunspot exploded with a massive X1.9-class flare. Expansive auroral displays are expected early January 20 though here, in Northeast Ohio, we are expecting cloudy, winter weather.

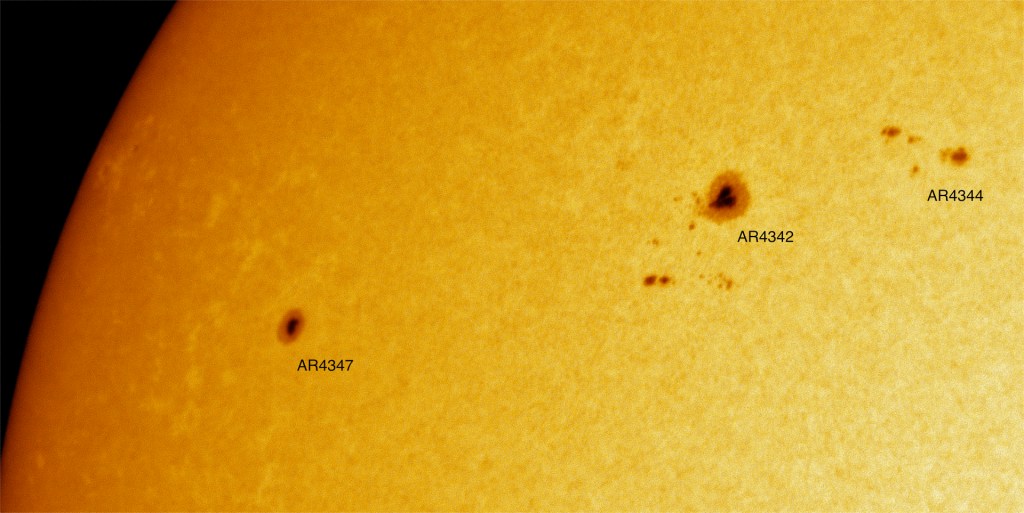
Also appearing on Sun, sunspots at AR4347, 4342, and 4344, shown here in white light (false color applied), in the northern hemisphere. Hydrogen-alpha light reveals features in Sun’s chromosphere, whereas white light imagery shows features, such as sunspots, in Sun’s photosphere — a layer deeper.

International Observe the Moon Night 2025

An International Observe the Moon Night promotional graphic. Credit: NASA

Note: The observatory construction is essentially complete with only a few “touch up” items and further outfitting remaining. We’ll eventually get around to writing and illustrating the story of the project. First, though, the 2025 International Observe the Moon Night….

October 4 marked International Observe the Moon Night (IOMN), an event billed as an opportunity to “unite people across the globe in a celebration of lunar observation, science, and exploration.” Coordinated and promoted by NASA, IOMN boasted 1,045 registered events worldwide. That count does not include informal events and individuals who, on their own, observed Earth’s Moon, encouraged by the promotion. Unfortunately, due to a U.S. government shutdown, NASA staff are unable to update the IOMN website and we may never know how it went this year.

While we did not host an outreach event, we did post fresh, new telescopic images depicting lunar details, along with descriptions of those events as our participation. This year, we concentrated our efforts on the Threads social media platform. What follows is what we posted.

Here’s a nice full-disk view of Earth’s Moon, one we made a few months ago with a phase very close to what we see tonight. The phase is called the “waxing gibbous” and is seen between the First Quarter and Full Moon. Moon will reach its full phase the night of October 6, this year.
Mare Humorum, aka Sea of Moisture, is the dark circle at the center of this image. It was formed in an impact by an asteroid or comet, the crater filled with basalt. The “sea” is about 264 miles across and is seen here near the terminator — the dividing line between night and day — not long after local lunar sunrise. Crater Gassendi is the circular ring that intersects with Humorum. The crater is about 69 miles in diameter; a smaller crater at its northern edge is called Gassed A.

Followup Edit: Spellcheck was convinced we meant to type “Gassed” when what we really wanted was Gassendi A. Maybe it was the chili we had for dinner.
Here’s crater Tycho, prominent even in the heavily-bombarded southern lunar highlands. Estimated to be 108 million years old, Tycho is about 53 miles in diameter but easily spotted using binoculars or a small telescope. The crater’s vast field of ejecta rays — the spray of material “splashed” out when an object hit Moon — is bright and forms lines that lead back to their origin. The feature was named after Danish astronomer Tycho Brahe.
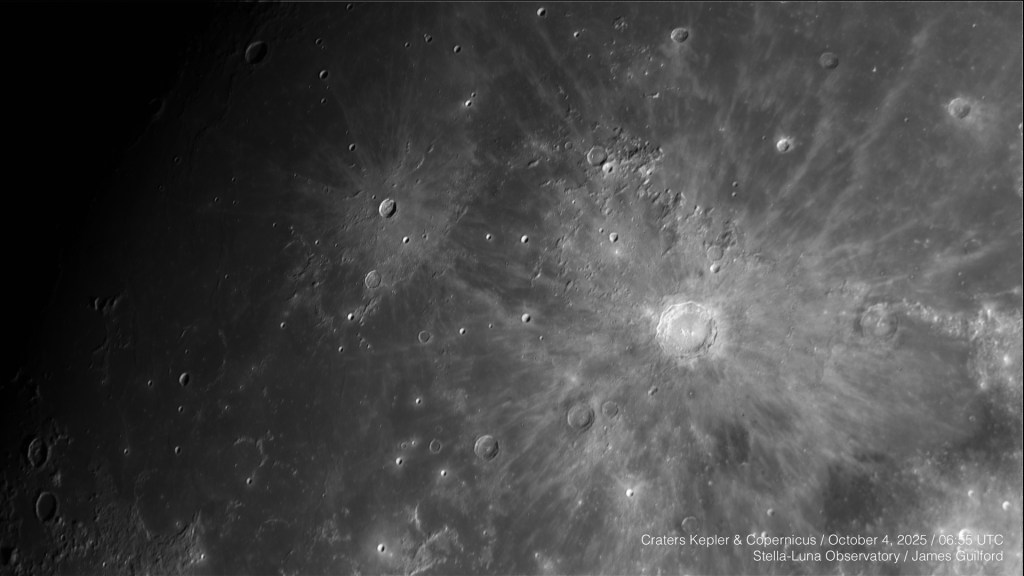
Also near the terminator, in Moon’s northwest, is this beautiful pair of craters: Kepler (left) and Copernicus. Like Tycho, Copernicus is marked by the prominent lines of ejecta radiating from the impact site, a crater about 58 miles in diameter. Crater Kepler, about 20 miles wide, lies to the west of Copernicus with its western rim shining brightly in the light of the lunar sunrise.
For our final image of the night, we’re posting our image of a complex area of Moon at the northern end of the terminator. In the upper right we see crater Anaxagoras and surroundings glowing brightly, contrasted against the stark blackness of space. The smooth band spanning the image is Mare Frigoris. “C” shaped arch marks Sinus Iridum, opening to Mare Imbrium. Crater Plato is the circle with a smooth, dark floor in the lower right. Notice the chain of smaller, satellite craters next to Plato.

Crater Plato is about 63 miles in diameter and about 3.84 billion years old. Once again, see how the western rims of the craters along the terminator shine in the low-angle light from the rising Sun.

We hope you have enjoyed what you have seen and will see online tonight, or were fortunate to attend an International Observe the Moon Night event in person. Outdoors, at home, online, or wherever you may be, we’re glad to have had you with us. We hope IOMN has united people across the globe in a celebration of lunar observation, science, and exploration, under one sky, appreciating one Moon. Goodnight, and keep looking up!

We Participated!

Sun in a Different Light

The Sun in Hydrogen-alpha light. An orange-colored partial disk across the frame contains chaotic patterns of swirling solar material. The picture caption contains further description.
Our neighborhood star: The Sun. Photographed in hydrogen-alpha light, this image shows the roiling chromosphere of our star with a large filament parallel with the left-hand edge of the picture, sunspots strung vertically across the center, and a good number of prominences along the rim, glowing against the dark background of space. Image has been rotated — east is up, north is right. Imaged 2024-10-26. 18:43 UTC. Credit: James Guilford, Stella-Luna Observatory

White light allows viewing Sun as if we could stare directly at it without the resulting blindness. The Herschel wedge does much the same thing but with, perhaps, a bit more contrast and detail. Both of those white light views allow us to see a layer of the solar atmosphere called the photosphere. In the photosphere the most apparent details are sunspots, standing black against a white background. With enough resolution we can also see granulation — enormous convective bubbles of searing solar plasma.

One layer above the photosphere — yes, above — is the chromosphere. Shining in the wavelength of hydrogen-alpha (Ha), the chromosphere is not visible to us without light filters that exclude all light but Ha. A wholly different view of our Sun is available in that wavelength. Swirling seas of plasma form curves and hash as they are moved by magnetic fields, long filaments float over those seas, as fountains of glowing gas arc from the solar disk contrasted against the blackness of space. On closer examination, the solar limb appears rough, a bit like a fine-toothed saw blade, as innumerable spicules, jets of glowing gas, are seen in contrast. Yes, sunspots are visible but are no longer the primary interest.

After many tries and failures at processing images to best show the chromosphere complete with prominences, I finally learned what some other imagers were using to process their images: Solar Toolbox — a package of programming scripts used with the PixInsight imaging application. I still have much to learn about Toolbox but it has already been enormously helpful to me in the challenging world of solar imaging! Thus, the image above is from very good data recorded about seven months ago, now reprocessed using Toolbox.

A fine day for some solar astronomy and a fond farewell to AR4079

Our temporary observing setups are assembled on the base/floor of the planned observatory. The light orange bucket, at center, protects an empty electrical conduit that will provide utility power to a permanent pier that will be installed there. In the foreground is a table supporting a light shield for the laptop computer. The large tripod next to the table supports the white light imaging scope. In the background is the Sky-Watcher SolarQuest mount with our Coronado hydrogen-alpha solar scope attached.

We’re still doing open-air astronomy though we have a nice, solid, clean, and level space to set up our gear! This is the setup we were using today to record the sunspot at active region 4079 as it is about to roll over the solar limb/horizon. Fortunately, though it’s a very temporary setup, the portable gear we use for casual solar imaging is fairly easy to set up.

From an unusual vantage point, a picture of the solar setup used today to record the passage of active region 4079 toward Sun’s horizon. The red object is the planetary camera.

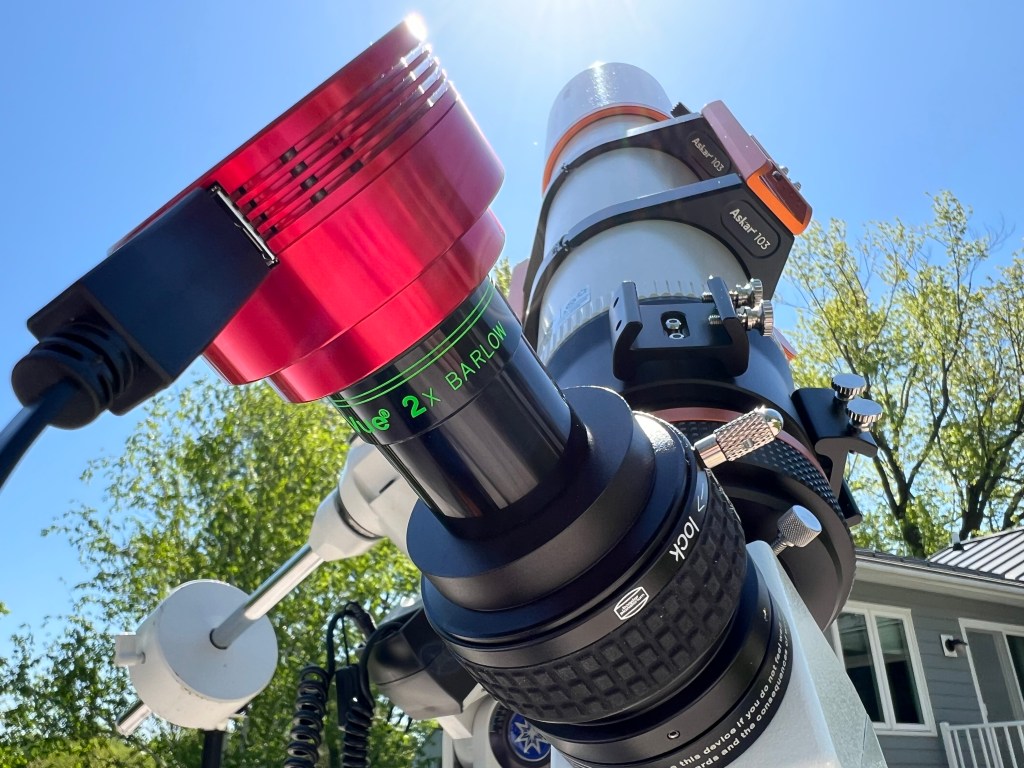
We continued experiments to determine what gear will work together for imaging. There were a few surprises and there’s need for more experimentation. What we settled on for today’s solar efforts is pictured above and includes: Askar 103 APO telescope, Meade LXD75 Goto Mount, TeleVue 2X Barlow, Baader Planetarium Safety Herschel Wedge, and ZWO ASI678MM monochrome planetary camera.

The sun as it appeared at 11:32 AM EDT on May 10, 2025. Sunspot/Active Region numbers are labeled in this image with AR4079 very near the solar western limb or edge.

Although the sky was clear, seeing was a bit shaky so once again, sharpness wasn’t what we’d like. Still, in all, we got the shot we wanted and learned a few things about our astronomy equipment. Also, the sky was blue, the air was pleasant, and birds were singing, so not a bad way to spend a couple of hours.

A closeup view of the sunspot at AR4079. There is a bright line splitting the dark central umbra of the sunspot, the gray penumbra radiating in filaments around it. White cloud-like areas surround the sunspot, especially to its north; called plage, they are associated with areas of concentrated magnetic field.